
前言
Kubernetes作为容器编排工具,简化容器管理,提升工作效率而颇受青睐。很多新手部署Kubernetes由于“科学上网”问题举步维艰,本文以实战经验详解kubeadm不用“科学上网”部署Kubernetes的最简方法。
一、Kubernetes简介
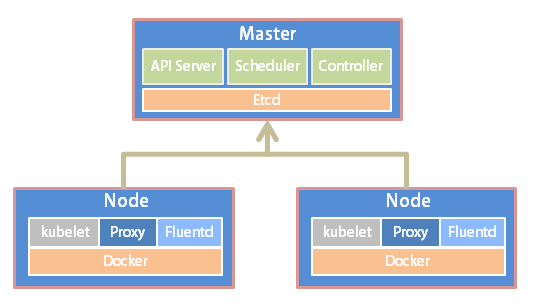
Kubernetes(简称K8S)是开源的容器集群管理系统,可以实现容器集群的自动化部署、自动扩缩容、维护等功能。它既是一款容器编排工具,也是全新的基于容器技术的分布式架构领先方案。在Docker技术的基础上,为容器化的应用提供部署运行、资源调度、服务发现和动态伸缩等功能,提高了大规模容器集群管理的便捷性。
K8S集群中有管理节点与工作节点两种类型。管理节点主要负责K8S集群管理,集群中各节点间的信息交互、任务调度,还负责容器、Pod、NameSpaces、PV等生命周期的管理。工作节点主要为容器和Pod提供计算资源,Pod及容器全部运行在工作节点上,工作节点通过kubelet服务与管理节点通信以管理容器的生命周期,并与集群其他节点进行通信。
二、环境准备
Kubernetes支持在物理服务器或虚拟机中运行,本次使用虚拟机准备测试环境,硬件配置信息如表所示:
| IP地址 | 节点角色 | CPU | Memory | Hostname | 磁盘 |
| 10.10.10.10 | master | >=2c | >=2G | master | sda、sdb |
| 10.10.10.11 | worker | >=2c | >=2G | node1 | sda、sdb |
| 10.10.10.12 | worker | >=2c | >=2G | node2 | sda、sdb |
注:在所有节点上进行如下操作
1.设置主机名hostname,管理节点设置主机名为 master 。
hostnamectl set-hostname master
需要设置其他主机名称时,可将 master 替换为正确的主机名node1、node2即可。
2.编辑 /etc/hosts 文件,添加域名解析。
cat <<EOF >>/etc/hosts

10.10.10.10 master

10.10.10.11 node1

10.10.10.12 node2

EOF
3.关闭防火墙、selinux和swap。
systemctl stop firewalld

systemctl disable firewalld

setenforce 0

sed -i "s/^SELINUX=enforcing/SELINUX=disabled/g" /etc/selinux/config

swapoff -a

sed -i 's/.*swap.*/#&/' /etc/fstab
4.配置内核参数,将桥接的IPv4流量传递到iptables的链
cat > /etc/sysctl.d/k8s.conf <<EOF

net.bridge.bridge-nf-call-ip6tables = 1

net.bridge.bridge-nf-call-iptables = 1

EOF

sysctl --system
5.配置国内yum源
yum install -y wget

mkdir /etc/yum.repos.d/bak && mv /etc/yum.repos.d/*.repo /etc/yum.repos.d/bak

wget -O /etc/yum.repos.d/CentOS-Base.repo http://mirrors.cloud.tencent.com/repo/centos7_base.repo

wget -O /etc/yum.repos.d/epel.repo http://mirrors.cloud.tencent.com/repo/epel-7.repo

yum clean all && yum makecache
配置国内Kubernetes源
cat <<EOF > /etc/yum.repos.d/kubernetes.repo

[kubernetes]

name=Kubernetes

baseurl=https://mirrors.aliyun.com/kubernetes/yum/repos/kubernetes-el7-x86_64/

enabled=1

gpgcheck=1

repo_gpgcheck=1

gpgkey=https://mirrors.aliyun.com/kubernetes/yum/doc/yum-key.gpg https://mirrors.aliyun.com/kubernetes/yum/doc/rpm-package-key.gpg

EOF
配置 docker 源
wget https://mirrors.aliyun.com/docker-ce/linux/centos/docker-ce.repo -O /etc/yum.repos.d/docker-ce.repo
三、软件安装
注:在所有节点上进行如下操作
1.安装docker
yum install -y docker-ce-18.06.1.ce-3.el7

systemctl enable docker && systemctl start docker

docker –version

Docker version 18.06.1-ce, build e68fc7a
docker服务为容器运行提供计算资源,是所有容器运行的基本平台。
2.安装kubeadm、kubelet、kubectl
yum install -y kubelet kubeadm kubectl

systemctl enable kubelet
Kubelet负责与其他节点集群通信,并进行本节点Pod和容器生命周期的管理。Kubeadm是Kubernetes的自动化部署工具,降低了部署难度,提高效率。Kubectl是Kubernetes集群管理工具。
四、部署master 节点
注:在master节点上进行如下操作
1.在master进行Kubernetes集群初始化。
kubeadm init --kubernetes-version=1.14.2 \

--apiserver-advertise-address=10.10.10.10 \

--image-repository registry.aliyuncs.com/google_containers \

--service-cidr=10.1.0.0/16 \

--pod-network-cidr=10.244.0.0/16
定义POD的网段为: 10.244.0.0/16, api server地址就是master本机IP地址。
这一步很关键,由于kubeadm 默认从官网k8s.grc.io下载所需镜像,国内无法访问,因此需要通过–image-repository指定阿里云镜像仓库地址,很多新手初次部署都卡在此环节无法进行后续配置。
集群初始化成功后返回如下信息:
记录生成的最后部分内容,此内容需要在其它节点加入Kubernetes集群时执行。
kubeadm join 10.10.10.10:6443 --token kekvgu.nw1n76h84f4camj6 \

--discovery-token-ca-cert-hash sha256:4ee74205227c78ca62f2d641635afa4d50e6634acfaa8291f28582c7e3b0e30e
2.配置kubectl工具
mkdir -p /root/.kube

cp /etc/kubernetes/admin.conf /root/.kube/config

kubectl get nodes

kubectl get cs
3.部署flannel网络
kubectl apply -f https://raw.githubusercontent.com/coreos/flannel/a70459be0084506e4ec919aa1c114638878db11b/Documentation/kube-flannel.yml
五、部署node节点
注:在所有node节点上进行如下操作
执行如下命令,使所有node节点加入Kubernetes集群
kubeadm join 10.10.10.10:6443 --token kekvgu.nw1n76h84f4camj6 \

--discovery-token-ca-cert-hash sha256:4ee74205227c78ca62f2d641635afa4d50e6634acfaa8291f28582c7e3b0e30e
此命令为集群初始化时(kubeadm init)返回结果中的内容。
六、集群状态检测
注:在master节点上进行如下操作
1.在master节点输入命令检查集群状态,返回如下结果则集群状态正常。
kubectl get nodes

NAME     STATUS   ROLES    AGE     VERSION

master   Ready    master   26m     v1.14.2

node1    Ready    <none>   3m10s   v1.14.2

node2    Ready    <none>   3m      v1.14.2
重点查看STATUS内容为Ready时,则说明集群状态正常。
2.创建Pod以验证集群是否正常。
kubectl create deployment nginx --image=nginx
kubectl expose deployment nginx --port=80 --type=NodePort
kubectl get pod,svc
七、部署Dashboard
注:在master节点上进行如下操作
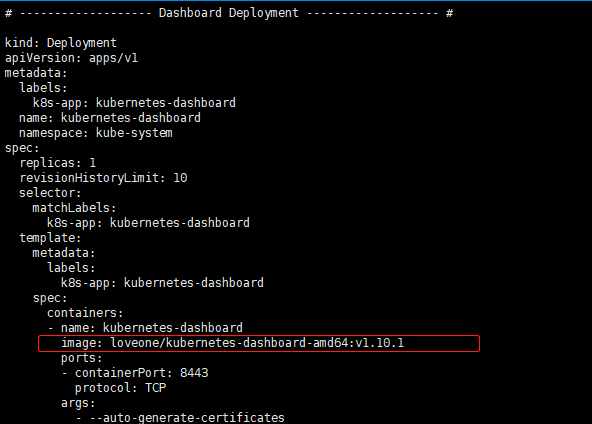
1.创建Dashboard的yaml文件
wget https://raw.githubusercontent.com/kubernetes/dashboard/v1.10.1/src/deploy/recommended/kubernetes-dashboard.yaml
使用如下命令或直接手动编辑kubernetes-dashboard.yaml文件
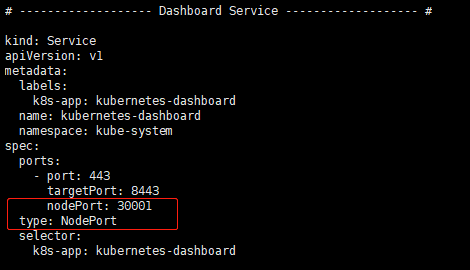
sed -i 's/k8s.gcr.io/loveone/g' kubernetes-dashboard.yaml
sed -i '/targetPort:/a\ \ \ \ \ \ nodePort: 30001\n\ \ type: NodePort' kubernetes-dashboard.yaml
手动编辑kubernetes-dashboard.yaml文件时,需要修改两处内容,首先在Dashboard Deployment部分修改Dashboard镜像下载链接,由于默认从官方社区下载,而不“科学上网”是无法下载的,因此修改为:image: loveone/kubernetes-dashboard-amd64:v1.10.1 修改后内容如图:
此外,需要在Dashboard Service内容加入nodePort: 30001和type: NodePort两项内容,将Dashboard访问端口映射为节点端口,以供外部访问,编辑完成后,状态如图
2.部署Dashboard
kubectl create -f kubernetes-dashboard.yaml
3.创建完成后,检查相关服务运行状态
kubectl get deployment kubernetes-dashboard -n kube-system

kubectl get pods -n kube-system -o wide

kubectl get services -n kube-system

netstat -ntlp|grep 30001
4.在Firefox浏览器输入Dashboard访问地址:https://10.10.10.10:30001
5.查看访问Dashboard的认证令牌
kubectl create serviceaccount  dashboard-admin -n kube-system
kubectl create clusterrolebinding  dashboard-admin --clusterrole=cluster-admin --serviceaccount=kube-system:dashboard-admin
kubectl describe secrets -n kube-system $(kubectl -n kube-system get secret | awk '/dashboard-admin/{print $1}')
6.使用输出的token登录Dashboard。
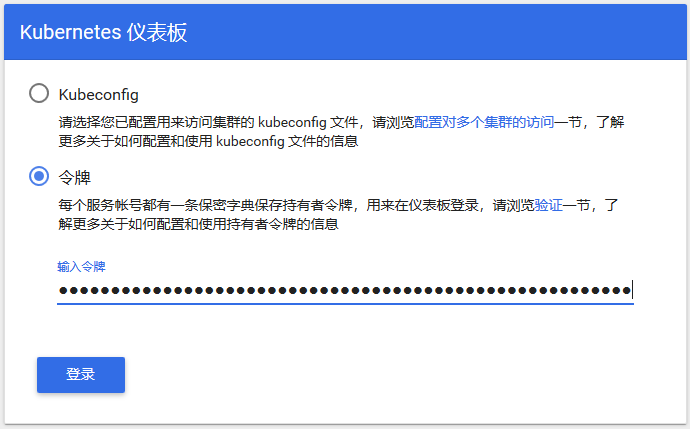
认证通过后,登录Dashboard首页如图
如有问题,可扫描联系,以便我及时回复


Kubeadm方式安装kubernetes,可以用于生产环境吗?
可以的,不过生产环境的话还要做其他配置
在执行 kubeadm init 这部 还是遇到了问题
[preflight] You can also perform this action in beforehand using ‘kubeadm config images pull’
error execution phase preflight: [preflight] Some fatal errors occurred:
[ERROR ImagePull]: failed to pull image k8s.gcr.io/kube-apiserver:v1.14.2: output: Error response from daemon: Get https://k8s.gcr.io/v2/: x509: certificate is valid for http://www.webhostingtest1.com, webhostingtest1.com, not k8s.gcr.io
, error: exit status 1
epel源和kubernetes源在执行yum makecache的时候都报错:
failure: repodata/repomd.xml from kubernetes: [Errno 256] No more mirrors to try.
https://mirrors.aliyun.com/kubernetes/yum/repos/kubernetes-el7-x86_64/repodata/repomd.xml: [Errno 14] curl#60 – “Peer’s Certificate has expired.”
是直接复制的我的yum源吗?刚才我试了一下可以的
NET::ERR_CERT_INVALID
Subject: .
Issuer: .
Expires on: 293878年1月10日
Current date: 2019年6月9日
PEM encoded chain:
—–BEGIN CERTIFICATE—–
MIIBKzCB0aADAgECAhEA5t37ISIuwHfW3MOzrz6kvDAKBggqhkjOPQQDAjAMMQow
CAYDVQQDEwEuMCIYDzAwMDEwMTAxMDAwMDAwWhgPMDAwMTAxMDEwMDAwMDBaMAwx
CjAIBgNVBAMTAS4wWTATBgcqhkjOPQIBBggqhkjOPQMBBwNCAARJrrWpgPKRT91/
DlzX+KIa/peBWcfKgAsRNkEvgg0pZ82kDIJ+G1c0qgljtenGBZIqhroI/t49cAPf
DgKwIqnDoxAwDjAMBgNVHREEBTADggEuMAoGCCqGSM49BAMCA0kAMEYCIQDrqkqm
/IlO2tkXbsGXHr2NZCY8HuOZYvK7q7Nlfbna3gIhAIANaV2vYGqUUi/5sKADPDQt
J1MC5Vs7zUERlp+rlQq7
—–END CERTIFICATE—–
不需要安装etcd吗?
“`
coredns-8686dcc4fd-2k5wh 0/1 CrashLoopBackOff 5 8m22s 172.244.1.7 node1
coredns-8686dcc4fd-2mspg 0/1 CrashLoopBackOff 5 8m22s 172.244.2.6 node2
“`
为什么我的coredns启不来
最后登录时选择“令牌”,查看到的令牌有30几个,是否要创建用户,生成令牌呢?我卡在最后一步了,望求后续步骤,谢谢。
kubectl create serviceaccount admin-user -n kube-system
kubectl create clusterrolebinding admin-user –clusterrole=cluster-admin –serviceaccount=kube-system:admin-user
kubectl -n kube-system describe secret $(kubectl -n kube-system get secret | grep admin-user | awk ‘{print $1}’)
按照这个操作,创建一个访问用户就可以了,是我的疏忽,我更新下文章
node状态都是NotReady,
[root@master ~]# kubectl get nodes
NAME STATUS ROLES AGE VERSION
master NotReady master 3h56m v1.14.3
node1 NotReady 24m v1.14.3
node2 NotReady 24m v1.14.3
执行完后可能需要等待十几秒钟,正常情况开始是NotReady,一会会自动变成Ready的,如果长时间等待还不变那得再排查了
我也是NotReady。。。。
在Firefox浏览器输入Dashboard访问地址:https://10.10.10.10:30001
本地安装完成,Dashboard 也跑起来,但是通过谷歌浏览器访问不能访问,浏览器显示‘您的连接不是私密连接’,Daskboard的pod logs日志显示“2019/06/15 08:38:24 http: TLS handshake error from 10.244.2.1:57839: remote error: tls: unknown certificate
2019/06/15 08:38:39 Metric client health check failed: the server could not find the requested resource (get services heapster). Retrying in 30 seconds.”
kubectl create serviceaccount admin-user -n kube-system
kubectl create clusterrolebinding admin-user –clusterrole=cluster-admin –serviceaccount=kube-system:admin-user
kubectl -n kube-system describe secret $(kubectl -n kube-system get secret | grep admin-user | awk ‘{print $1}’)
按照这个步骤也创建访问用户就可以了
k8s 1.18 dashboard 上述问题 mark
https://raw.githubusercontent.com/kubernetes/dashboard/v2.0.0-beta3/aio/deploy/recommended.yaml
其他节点加入集群的时候,一直在那里不动是什么原因
我也是,请问你解决了吗??
谷歌打开网址,提示不是私密连接
92.168.11.133 通常会使用加密技术来保护您的信息。Google Chrome 此次尝试连接到 192.168.11.133 时,此网站发回了异常的错误凭据。这可能是因为有攻击者在试图冒充 192.168.11.133,或 Wi-Fi 登录屏幕中断了此次连接。请放心,您的信息仍然是安全的,因为 Google Chrome 尚未进行任何数据交换便停止了连接。
您目前无法访问 192.168.11.133,因为此网站发送了 Google Chrome 无法处理的杂乱凭据。网络错误和攻击通常是暂时的,因此,此网页稍后可能会恢复正常。
创建用户的命令第二条跑不通,其他两条跑通了。
kubectl create clusterrolebinding admin-user –clusterrole=cluster-admin –serviceaccount=kube-system:admin-user ##这条运行不了,报错error: exactly one NAME is required, got 3
卡在这不知该如何处理,希望能答复一下,十分感谢
请问您 kubeadm join 192.168.10.11:6443 –token k64baq.qrxambq3isgmhoyy –discovery-token-ca-cert-hash sha256:39c384702d2df1ac5d2bcf3356844f5e0f3cccf46b6c395b5c7d17dbdee9363f花了多长时间我docker images可以看到镜像但是等了1个多小时了还是没有执行完毕
Pods中无法ping通外网地址, 这该怎么解决呢
请问我kubectl apply -f https://raw.githubusercontent.com/coreos/flannel/a70459be0084506e4ec919aa1c114638878db11b/Documentation/kube-flannel.yml执行之后, kubectl get pod -A一直显示 kube-flannel-ds-amd64-62bj9 0/1 Init:ImagePullBackOff怎么办
老哥 你的coredns又出现pendding的情况么
加入 kubectl apply -f https://git.io/weave-kube-1.6
请问你解决这个问题了没有啊
kubeadm init遇到的问题,怎么解决?
error execution phase preflight: [preflight] Some fatal errors occurred:
[ERROR KubeletVersion]: the kubelet version is higher than the control plane version. This is not a supported version skew and may lead to a malfunctional cluster. Kubelet version: “1.15.0” Control plane version: “1.14.2”
你把版本换成1.15.0就可以了
kubectl get pods –all-namespaces -o wide 的时候,coredns状态为pendding,kube-flannel-ds-amd64状态为Init:ImagePullBackOff,这个怎么解决,有老哥知道么
按照以上步骤操作,查看STATUS内容为NotReady,哪位大佬解释一下是为什么,解决方案是什么?
啊哈哈哈 我也遇到这个问题了 坐等大佬解答
安装好后无法访问。
kubectl get nodes
NAME STATUS ROLES AGE VERSION
master Ready master 42h v1.15.0
node1 Ready 41h v1.15.0
kubectl get services -n kube-system
NAME TYPE CLUSTER-IP EXTERNAL-IP PORT(S) AGE
kube-dns ClusterIP 10.1.0.10 53/UDP,53/TCP,9153/TCP 42h
kubernetes-dashboard NodePort 10.1.235.88 443:30001/TCP 41h
curl https://10.10.10.10:30001
curl: (7) Failed connect to 10.10.10.10:30001; Connection timed out
--有没有排错指引?
这种方式的master节点如何高可用?
curl: (7) Failed connect to 10.10.10.10:30001; Connection timed out 超时了,怎么办啊。。
知道问题了。。 需要https访问,http不行。。
node节点无法连接etcd服务,master节点上执行kubectl get services –all-namespaces看不到etcd服务,请问这样正常吗
kubernetes-dashboard-7868569469-m54k8 0/1 CrashLoopBackOff 8 23m 10.224.2.5 k8s-node1
web一访问,就变成这样,请问这是什么问题
部署flannel网络插件时报错:kubectl apply -f https://raw.githubusercontent.com/coreos/flannel/a70459be0084506e4ec919aa1c114638878db11b/Documentation/kube-flannel.yml
错误信息:Error from server (NotFound): the server could not find the requested resource
我也遇到,如何解决?
前面都正常,输入Dashboard访问地址打不开页面,什么问题?
同求,前面都部署成功了,页面这里无法访问,但是服务都没什么问题
[root@master ~]# kubectl get pods -n kube-system -o wide
NAME READY STATUS RESTARTS AGE IP NODE NOMINATED NODE READINESS GATES
coredns-bccdc95cf-8kzxz 1/1 Running 0 12m 192.244.0.3 master
coredns-bccdc95cf-tc4wk 1/1 Running 0 12m 192.244.0.2 master
etcd-master 1/1 Running 0 11m 192.168.100.10 master
kube-apiserver-master 1/1 Running 0 11m 192.168.100.10 master
kube-controller-manager-master 1/1 Running 0 11m 192.168.100.10 master
kube-flannel-ds-amd64-6jhlw 1/1 Running 0 11m 192.168.100.10 master
kube-flannel-ds-amd64-9bl54 1/1 Running 0 11m 192.168.100.30 node2
kube-flannel-ds-amd64-twsk5 1/1 Running 1 11m 192.168.100.20 node1
kube-proxy-nlsvv 1/1 Running 0 12m 192.168.100.10 master
kube-proxy-nnk8c 1/1 Running 0 11m 192.168.100.20 node1
kube-proxy-p785n 1/1 Running 0 11m 192.168.100.30 node2
kube-scheduler-master 1/1 Running 0 11m 192.168.100.10 master
kubernetes-dashboard-59b5cb5c6b-g7l68 1/1 Running 6 9m51s 192.244.1.3 node1
我意思最后一步网页打不开,前面都是ok的
防火墙的问题,防火墙加入30001的开放规则就可以。
但是我的防火墙一直都是关闭的
兄弟,我也遇到了,看了log,说是api-server地址没改,但是我改了后还是不行,不知道你解决没有
我的问题解决了,就是浏览器的问题,用遨游、谷歌、搜狗都报167错误,最后安装了一个火狐好了
一直master NotReady,请教下怎么解决。
[root@master ~]# kubectl describe node master
Warning FailedNodeAllocatableEnforcement 7m9s kubelet, master Failed to update Node Allocatable Limits [“kubepods”]: failed to set supported cgroup subsystems for cgroup [kubepods]: Failed to find subsystem mount for required subsystem: pids
……
Normal Starting 12s kubelet, master Starting kubelet.
Normal NodeHasSufficientMemory 12s kubelet, master Node master status is now: NodeHasSufficientMemory
Normal NodeHasNoDiskPressure 12s kubelet, master Node master status is now: NodeHasNoDiskPressure
Normal Starting 1s kubelet, master Starting kubelet.
Normal NodeHasSufficientMemory 1s kubelet, master Node master status is now: NodeHasSufficientMemory
Normal NodeHasNoDiskPressure 1s kubelet, master Node master status is now: NodeHasNoDiskPressure
Normal NodeHasSufficientPID 1s kubelet, master Node master status is now: NodeHasSufficientPID
您好!node节点加入集群时报错:
月 16 15:07:23 node1 kubelet[42451]: Flag –cgroup-driver has been deprecated, This parameter should be set via the config file specified by the Kubelet’s –config flag.
7月 16 15:07:23 node1 kubelet[42451]: Flag –fail-swap-on has been deprecated, This parameter should be set via the config file specified by the Kubelet’s –config flag.
7月 16 15:07:23 node1 kubelet[42451]: Flag –cgroup-driver has been deprecated, This parameter should be set via the config file specified by the Kubelet’s –config flag.
7月 16 15:07:23 node1 kubelet[42451]: Flag –fail-swap-on has been deprecated, This parameter should be set via the config file specified by the Kubelet’s –config flag.
7月 16 15:07:23 node1 kubelet[42451]: I0716 15:07:23.779732 42451 server.go:425] Version: v1.15.0
7月 16 15:07:23 node1 kubelet[42451]: I0716 15:07:23.779932 42451 plugins.go:103] No cloud provider specified.
7月 16 15:07:23 node1 kubelet[42451]: W0716 15:07:23.779947 42451 server.go:564] standalone mode, no API client
7月 16 15:07:23 node1 kubelet[42451]: F0716 15:07:23.779958 42451 server.go:273] failed to run Kubelet: no client provided, cannot use webhook authentication
7月 16 15:07:23 node1 systemd[1]: kubelet.service: main process exited, code=exited, status=255/n/a
7月 16 15:07:23 node1 systemd[1]: Unit kubelet.service entered failed state.
7月 16 15:07:23 node1 systemd[1]: kubelet.service failed.
求解这个是什么原因,如何解决
非常感谢您的分享,按照这篇文章的指引,我每天尝试安装一遍。
终于在第22天的这次安装中,我成功了!非常感谢!!
老铁,佩服您的毅力,不过,有问题多交流交流,少走一些弯路啊
关于谷歌浏览器无法打开仪表板的问题,可以参考这篇《解决Google浏览器不能打开kubernetes dashboard方法》https://www.jianshu.com/p/8021285cc37d 来解决。
kubectl get nodes
kubectl apply -f https://raw.githubusercontent.com/coreos/flannel/a70459be0084506e4ec919aa1c114638878db11b/Documentation/kube-flannel.yml
上面的url访问不了
您好,我在部署完以后,Dashboard 部署在node2上面,但是我在浏览器上面要访问UI界面的话也只能访问到node2,不能在master上面访问吗?
[root@master ~]# tail -f /var/log/messages
Unable to update cni config: no networks found in /etc/cni/net.d
Container runtime network not ready: NetworkReady=false reason:NetworkPluginNotReady message:docker: network plugin is not ready: cni config uninitialized
[root@master ~]# kubectl get pods -n kube-system -o wide
coredns-58cc8c89f4-ctq64 0/1 Pending
[root@master ~]# kubectl get nodes
NAME STATUS ROLES AGE VERSION
master NotReady master 44m v1.16.2
node1 NotReady 2m35s v1.16.2
node2 NotReady 2m1s v1.16.2