
0x00 文章楔子
本文停止后续维护,请转至:
kubeadm HA master(v1.14.0)离线包 + 自动化脚本 + 常用插件 For Centos/Fedora
本文面向具有一定K8s使用经验的读者
1.13.0版本的kubeadm有了一个较大的发展,kubeadm配置文件的API已经进入了beta阶段。
并且kubeadm已经实验性的启用了直接通过kubeadm join命令构建HA master的功能,很大程度上简化了HA master的构建过程。
另一方面,heapster项目已经被废弃并从1.13.0版本开始停止支持,未来建议使用metrics和Prometheus代替。
本系列从1.13.0版本开始将直接使用kubeadm join实现HA master,也不再提供heapster插件,而是使用metrics替代之。
本方案中升级内核是必要的,为私有仓库单独准备一台机器也是必要的,如果私自跳过步骤或调整结构,个人对脚本运行的结果不做保证
本文中的自动化部署脚本可以在Lentil1016/kubeadm-ha找到,欢迎Star/Fork/提issue和PR。
在我的环境上进行示例自动化部署的录像可以在该链接查看
集群方案:
- 发行版:CentOS 7
- 容器运行时:Docker-17.03.2-ce
- 内核: 4.19.6-300.fc29.x86_64
- 版本:Kubernetes: 1.13.0
- 网络方案: Calico
- kube-proxy mode: IPVS
- master高可用方案:keepalived LVS
- DNS插件: CoreDNS
- metrics插件:metrics-server
- 界面:kubernetes-dashboard
- ingress控制器:traefik
0x01 Kubernetes集群搭建
集群结构摘要
此处为举列说明,假定各个机器的主机信息以及IP分布如下,需要额外说明的是,由于私有仓库需要占用80端口,与ingress controller冲突,因此为私有仓库单独准备一台机器是必要的:
| Host Name | Role | IP |
|---|---|---|
| registry | image registry | 10.130.38.80 |
| centos-7-x86-64-29-80 | master-1 | 10.130.29.80 |
| centos-7-x86-64-29-81 | master-2 | 10.130.29.81 |
| centos-7-x86-64-29-82 | master-3 | 10.130.29.82 |
| – | Virtual IP | 10.130.29.83 |
| node1 | worker | 10.130.38.105 |
| node2 | worker | 10.130.38.106 |
| node3 | worker | 10.130.38.107 |
进行系统配置
在所有机器上下载内核rpm包,并且执行下面的脚本,配置注记:
- 关闭防火墙、selinux
- 关闭系统的Swap,Kubernetes 1.8开始要求。
- 关闭linux swap空间的swappiness
- 配置L2网桥在转发包时会被iptables的FORWARD规则所过滤,该配置被CNI插件需要,更多信息请参考Network Plugin Requirements
- 升级内核到最新,原因见issue#19
- 开启IPVS
# 所有主机:基本系统配置

# 关闭Selinux/firewalld
systemctl stop firewalld
systemctl disable firewalld
setenforce 0
sed -i "s/SELINUX=enforcing/SELINUX=disabled/g" /etc/selinux/config

# 关闭交换分区
swapoff -a
yes | cp /etc/fstab /etc/fstab_bak
cat /etc/fstab_bak |grep -v swap > /etc/fstab

# 设置网桥包经IPTables,core文件生成路径
echo """
vm.swappiness = 0
net.bridge.bridge-nf-call-ip6tables = 1
net.bridge.bridge-nf-call-iptables = 1
""" > /etc/sysctl.conf
sysctl -p

# 同步时间
yum install -y ntpdate
ntpdate -u ntp.api.bz

# 升级内核
rpm -Uvh http://www.elrepo.org/elrepo-release-7.0-2.el7.elrepo.noarch.rpm ;yum --enablerepo=elrepo-kernel install kernel-ml-devel kernel-ml -y

# 检查默认内核版本是否大于4.14,否则请调整默认启动参数
grub2-editenv list

#重启以更换内核
reboot

# 确认内核版本后,开启IPVS
uname -a
cat > /etc/sysconfig/modules/ipvs.modules <<EOF
#!/bin/bash
ipvs_modules="ip_vs ip_vs_lc ip_vs_wlc ip_vs_rr ip_vs_wrr ip_vs_lblc ip_vs_lblcr ip_vs_dh ip_vs_sh ip_vs_fo ip_vs_nq ip_vs_sed ip_vs_ftp nf_conntrack"
for kernel_module in \${ipvs_modules}; do
 /sbin/modinfo -F filename \${kernel_module} > /dev/null 2>&1
 if [ $? -eq 0 ]; then
 /sbin/modprobe \${kernel_module}
 fi
done
EOF
chmod 755 /etc/sysconfig/modules/ipvs.modules && bash /etc/sysconfig/modules/ipvs.modules && lsmod | grep ip_vs
执行sysctl -p报错请参考centos7添加bridge-nf-call-ip6tables出现No such file or directory
Kubernetes要求集群中所有机器具有不同的Mac地址、产品uuid、Hostname。可以使用如下命令查看Mac和uuid
# 所有主机:检查UUID和Mac

cat /sys/class/dmi/id/product_uuid
ip link
安装配置Docker
Docker从1.13版本开始调整了默认的防火墙规则,禁用了iptables filter表中FOWARD链,这样会引起Kubernetes集群中跨Node的Pod无法通信,因此docker安装完成后,还需要手动修改iptables规则。
# 所有主机:安装配置docker

# 安装docker
yum install -y yum-utils device-mapper-persistent-data lvm2
yum-config-manager \
 --add-repo \
 https://download.docker.com/linux/centos/docker-ce.repo

yum makecache fast
yum install -y docker-ce

# 编辑systemctl的Docker启动文件
sed -i "13i ExecStartPost=/usr/sbin/iptables -P FORWARD ACCEPT" /usr/lib/systemd/system/docker.service

# 启动docker
systemctl daemon-reload
systemctl enable docker
systemctl start docker
安装私有镜像库
如果不能翻墙,需要使用本文提供的私有镜像源,则还需要为docker做如下配置,将K8s官方镜像库的几个域名设置为insecure-registry,然后设置hosts使它们指向私有源。
# 所有主机:http私有源配置

# 为Docker配置一下私有源
mkdir -p /etc/docker
echo -e '{\n"insecure-registries":["k8s.gcr.io", "gcr.io", "quay.io"]\n}' > /etc/docker/daemon.json
systemctl restart docker

# 此处应当修改为registry所在机器的IP
REGISTRY_HOST="10.130.38.80"
# 设置Hosts
yes | cp /etc/hosts /etc/hosts_bak
cat /etc/hosts_bak|grep -vE '(gcr.io|harbor.io|quay.io)' > /etc/hosts
echo """
$REGISTRY_HOST gcr.io harbor.io k8s.gcr.io quay.io """ >> /etc/hosts
下载链接:链接:https://pan.baidu.com/s/1ZdmgnrYGVobc22FX__vYwg 提取码:69gq ,随后将该文件放置到registry机器上,并在registry主机上加载、启动该镜像
# registry:启动私有镜像库
docker load -i /path/to/k8s-repo-1.13.0
docker run --restart=always -d -p 80:5000 --name repo harbor.io:1180/system/k8s-repo:v1.13.0
该镜像库中包含如下镜像,全部来源于官方镜像站。

1.13.0版本镜像列表
安装配置kubernetes
基本安装
首先下载链接:链接:https://pan.baidu.com/s/1t3EWAt4AET7JaIVIbz-zHQ 提取码:djnf ,并放置在k8s各个master和worker主机上
# master & worker:安装kubernetes

yum install -y socat keepalived ipvsadm
cd /path/to/downloaded/file
tar -xzvf k8s-v1.13.0-rpms.tgz
cd k8s-v1.13.0
rpm -Uvh * --force
systemctl enable kubelet
kubeadm version -o short
配置免密码登陆
# master-1:生成ssh密钥对

ssh-keygen
# 三次回车后,密钥生成完成
cat ~/.ssh/id_rsa.pub
# 得到该机器的公钥如下图

将该公钥复制,并分别登陆到master-1 master-2 master-3的root用户,将它令起一行粘贴到 ~/.ssh/authorized_keys 文件中,包括master-1自己
复制完成后,从master-1上分别登陆master-1 master-2 master-3测试是否可以免密码登陆(请不要跳过这一步),可以的话便可以继续执行下一步
部署HA Master
HA Master的部署过程已经自动化,请在master-1上执行如下命令,并注意修改IP
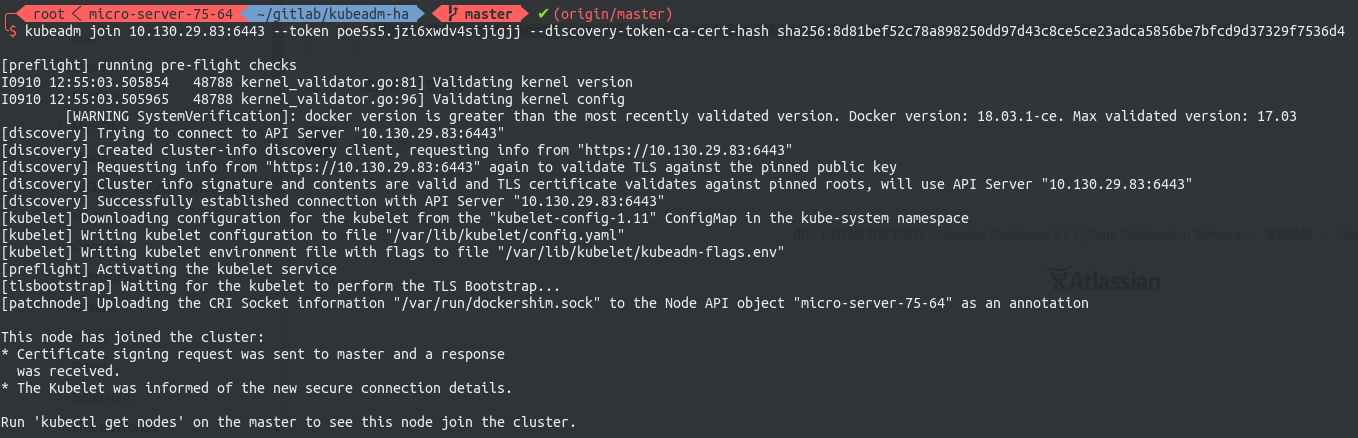
# 部署HA master

cd ~/

# 创建集群信息文件
echo """
CP0_IP=10.130.29.80
CP1_IP=10.130.29.81
CP2_IP=10.130.29.82
VIP=10.130.29.83
NET_IF=eth0
CIDR=10.244.0.0/16
""" > ./cluster-info

bash -c "$(curl -fsSL https://raw.githubusercontent.com/Lentil1016/kubeadm-ha/1.13.0/kubeha-gen.sh)"
# 该步骤将可能持续2到10分钟,在该脚本进行安装部署前,将有一次对安装信息进行检查确认的机会
可以在该链接查看我在自己的环境上安装全过程的录像,安装结束后会打印出如下的信息,最后一行为加入集群的命令。

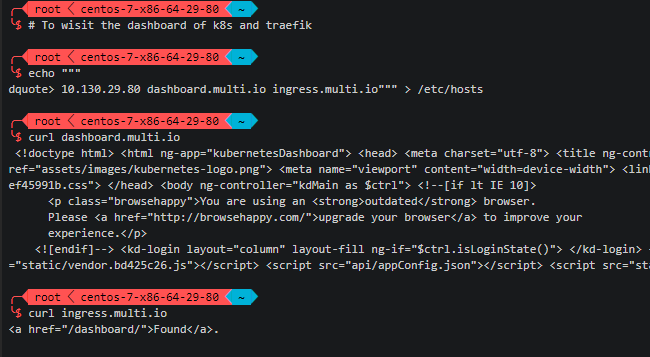
访问dashboard
如果需要访问kubernetes dashboard或traefik dashboard,只需要在浏览器所在机器上配置到任意master的hosts解析,然后访问对应域名即可。
echo """
10.130.29.80 dashboard.multi.io ingress.multi.io""" >> /etc/hosts
测试发现有时kubernetes dashboard容器会不响应请求,如果出现该情况请尝试删除dashboard的pod以重新启动该pod,即可解决该问题。
安装helm
如果需要安装helm,请先下载离线包链接:链接:https://pan.baidu.com/s/1B7WHuomXOmZKhHai4tV5MA 提取码:kgzi
cd /path/to/helm-v2.12.0-linux-amd64.tar/
tar -xzvf helm-v2.12.0-linux-amd64.tar
cd linux-amd64
cp helm /usr/local/bin
helm init --service-account=kubernetes-dashboard-admin --skip-refresh --upgrade
helm version
加入work node
现在可以将各节点入编到集群中。join command是由kubeadm动态生成的,其基本形式如下
# worker:将worker编入集群
kubeadm join 10.130.29.83:6443 --token 4n3hvt.sb8qjmno6l47tsww --discovery-token-ca-cert-hash sha256:a7f1de577bd8677a5d7fe4d765993645ae25d8b52a63a1133b74a595a7bb2e0f
其中包含了节点入编集群所需要携带的验证token,以防止外部恶意的节点进入集群。每个token自生成起24小时后过期。届时如果需要加入新的节点,则需要重新生成新的join token,请使用下面的命令生成,注意改写IP:
# master-1:生成指向VIP的Join Command
kubeadm token create --print-join-command|sed 's/${LOCAL_IP}/${VIP}/g'

随后到worker节点执行刚刚生成的join command即可将该节点编入集群。
至此,HA master Kubernetes 集群搭建完毕

谢谢博主,初学者受益匪浅。终端界面非常好看,能分享一下怎么弄的吗?
安装zsh和oh-my-zsh后,使用我的主题https://github.com/Lentil1016/lent-dotfile/blob/master/.zshrc即可
不需要
[root@master1 k8s-v1.13.0]# rpm -Uvh *
warning: 26d0db769cb8f64b417c3bbdcb24b7214f63d211fb889de55fe2fecc440e8fa7-kubelet-1.13.0-0.x86_64.rpm: Header V4 RSA/SHA512 Signature, key ID 3e1ba8d5: NOKEY
error: Failed dependencies:
cri-tools >= 1.11.0 is needed by kubeadm-1.13.0-0.x86_64
我重新打包上传了k8s-v1.13.0-rpms.tgz,烦请重新下载一下
链接:https://pan.baidu.com/s/1t3EWAt4AET7JaIVIbz-zHQ 提取码:djnf
我已经解决了,TKS;
另外最上方的表格中:– Virtual IP 10.130.29.83
是什么意思?
本文是通过keepalived实现的高可用,virtualIP是keepalived高可用+LVS负载均衡所使用的虚IP
keepalived是脚本中自动配置的
创建完成后,dashboard要访问这个Virtual IP吗,可是出现以下错误:{
“kind”: “Status”,
“apiVersion”: “v1”,
“metadata”: {},
“status”: “Failure”,
“message”: “forbidden: User \”system:anonymous\” cannot get path \”/\””,
“reason”: “Forbidden”,
“details”: {},
“code”: 403
}
kube-system traefik-ingress-controller-4zv69 0/1 Error 3 45s
一共三个。始终有一个ingress起不来
那个机器的80或者443端口应该被占用了
访问dashboard的方式文章里有写
bash -c “$(curl -fsSL https://raw.githubusercontent.com/Lentil1016/kubeadm-ha/1.13.0/kubeha-gen.sh)”
# 该步骤将可能持续2到10分钟,在该脚本进行安装部署前,将有一次对安装信息进行检查确认的机会
======
这个脚本我运了三次,没有影响吧
没有,脚本是幂等的
在设置好集群ip,执行脚本时出现了一系列错误:
1.Common Name (eg, your name or your server’s hostname) []:*.multi.io
Email Address []:lentil1016@gmail.com
Error from server (InternalError): an error on the server (“”) has prevented the request from succeeding
unable to recognize “https://raw.githubusercontent.com/Lentil1016/kubeadm-ha/1.13.0/plugin/traefik.yaml”: an error on the server (“”) has prevented the request from succeeding
2.cp: 无法创建普通文件”:/etc/keepalived/keepalived.conf”: 没有那个文件或目录
ssh: Could not resolve hostname
systemctl restart keepalived
kubeadm reset -f
rm -rf /etc/kubernetes/pki/: Name or service not known
apiServer.certSANs: Invalid value: “”: altname is not a valid dns label or ip address
cp: 无法获取”/etc/kubernetes/admin.conf” 的文件状态(stat): 没有那个文件或目录
3.unable to recognize “STDIN”: an error on the server (“”) has prevented the request from succeeding
请贴一下你的cluster-info文件
cluster-info:
master-01: 192.168.8.2
master-02: 192.168.8.3
master-02: 192.168.8.4
VIP: 192.168.8.5
Net Interface: ens33
CIDR: 192.168.0.0/16
pod-cidr和各个节点IP不能在同一个子网下
Failed to request cluster info, will try again: [Get https://172.16.6.200:6443/api/v1/namespaces/kube-public/configmaps/cluster-info: dial tcp 172.16.6.200:6443: connect: no route to host]
172.16.6.200是我设置的虚拟IP,请问这是什么原因??多谢
请问你这个问题解决了吗?qq:316973368
请问你这个问题解决了吗?qq:316973368
[root@master1 k8s]# chmod 755 /lib/modules/ipvs.modules && bash /lib/modules/ipvs.modules && lsmod | grep ip_vs
modprobe: FATAL: Module ip_vs_fo not found.
内核没升级
参考:https://github.com/coreos/bugs/issues/2518
好像内核不支持,运行modprobe nf_conntrack就行
他的是另一个模块,是ip_vs_fo找不到,他用的是3.10内核。另外内核nf_conntrack模块的问题已经在1.13.0版本中修复,参考https://github.com/Lentil1016/kubeadm-ha/issues/14。我的脚本中加载的也是nf_conntrack,理应没有问题。
大哥,k8s的百度云盘链接失效了,再给分享一下吧,谢谢。
不好意思看错了,链接没问题。
您好,请问这个Master 1 ,Master 2,Master 3 的 ip地址是怎么来的,是虚拟机的IP地址吗,还是自己定的, 而且VIP 和 NODE的 IP 又都是怎么来的呢?
全部要自己规划
比方说,我的虚拟机的IP地址是111.111.111.111,那么我想让这个虚拟机作为master1 那么我的master1的ip地址必须也是111.111.111.111吗?
是的
cluster-info:
master-01: 192.168.47.5
master-02:
master-02:
VIP: 192.168.47.4
Net Interface: ens33
CIDR: 192.168.0.0/16
这样为什么不可以
我不知道该说什么好。。。我可以哭么?
最后总是提示这个:
[discovery] Failed to request cluster info, will try again: [Get https://192.168.92.59:6443/api/v1/namespaces/kube-public/configmaps/cluster-info: dial tcp 192.168.92.59:6443: connect: connection refused]
看一下keepalived有没有启动
你好,我也遇到同样的问题,查看keepalived是起来了,但是keepalived日志中有报错信息
Dec 12 01:39:36 cassandra-4 Keepalived_healthcheckers[10679]: HTTP status code success to [10.0.221.128]:6443 url(1).
Dec 12 01:39:36 cassandra-4 Keepalived_healthcheckers[10679]: Remote Web server [10.0.221.128]:6443 succeed on service.
Dec 12 01:39:36 cassandra-4 Keepalived_healthcheckers[10679]: Adding service [10.0.221.128]:6443 to VS [10.0.221.250]:6443
Dec 12 01:39:36 cassandra-4 Keepalived_healthcheckers[10679]: IPVS (cmd 1159, errno 2): No such file or directory
解决了么?我的也一样,Master的HA切换不正常
keepalived.conf里的 nat_mask 255.255.255.0错了,改为 net_mask 255.255.255.0,就可以了
一个是他变量名写错了,应该是net_mask
另一个是掩码不应该给24位,改成255.255.255.255,即可!这是个主机地址,不能给网段
我也一样
可能是由于在keepalived启动的时候ipvs没有开启成功,首先请尝试再次运行“确认内核版本后,开启IPVS”部分的代码确认ipvs已经开启。
然后尝试在各个节点上执行
systemctl stop keepalivedsystemctl enable keepalived
systemctl start keepalived
然后查看是否依然存在该问题
一样的问题 各节点重试了 没起作用
由于我不擅长keepalived技术,你的问题我恐怕不能很快查到,建议在 https://github.com/Lentil1016/kubeadm-ha/issues/ 新开issue追踪该问题
我这边问题是那个负载均衡每次都把请求分给自己。导致连不过去
keepalived.conf里的 nat_mask 255.255.255.0错了,改为 net_mask 255.255.255.0,就可以了
NET_IF=eht1 这个地方更改下,会识别你的网卡
参考了本文和回复,现在已经成功搭好了集群,问题出在VPN的privoxy代理上,挂了代理后访问会出问题,把代理关了就好了。但是关了代理又不能科学上网了…不知道您有没有什么解决方法?试过在profile的no_porvoxy选项中加入ip地址,但是没有作用。1
Good to know
百度很贱的,不安装百度网盘就经常下载报错,建议换个别的方式。
如果有更好的选择,烦请推荐给我
阿里云镜像仓库
真有钱啊你
k8s 1.13.0 最高支持 18.06吧。你这个不会出现不兼容吗
我不清楚你是从哪里得到的消息,1.13.0的release note里写的是:kubeadm now properly recognizes Docker 18.09.0 and newer, but still treats 18.06 as the default supported version.
感谢博主,搭建成功了,但是遇到一个小问题,docker最高支持18.6 如果直接装,可能装到18.9提示不支持.
good to know. 我没有试过,但是kubernetes 1.13.0的release note里明确的写了会识别18.09.0
请问楼主,我的脚本成功执行了,但是get nodes的主节点只有一个master角色呢?怎么处理?
请将部署过程的日志粘贴并评论至 https://github.com/Lentil1016/kubeadm-ha/issues/34
10.192.30.114:6443: connect: connection refused [VIP]那个节点始终连不上reset] Unable to fetch the kubeadm-config ConfigMap, using etcd pod spec as fallback: failed to get config map: Get https://10.192.30.114:6443/api/v1/namespaces/kube-system/configmaps/kubeadm-config: dial tcp 10.192.30.114:6443: connect: connection refused
private registry 做上面那些配置是必要的吗 还是任何机器有docker起起来就可以了?
我不清楚这里的“那些配置”是指哪些配置,但我比较确定上面没有多余的配置,因为我一直在尝试让这篇文章变短。
docker load -i /path/to/k8s-repo-1.13.0,执行这个命令,启动私有镜像,一直报错,请问是不是文件有问题呢?
报错内容:Error processing tar file(exit status 1): archive/tar: invalid tar header
有没有试过重新下载呢?这个文件应该大多数使用这篇文章搭建的人都下过,你的包下的过程中出问题的可能性更大一些。
你的文件没有tar后缀么?
linux里文件名后缀不重要,你想要tar后缀可以自己加。。。。附上MD5校验值,You might need it.
md5sum k8s-repo-1.13.0e281b9bbd648fa60a1793d53acd6c6e7 k8s-repo-1.13.0
[kubelet-check] Initial timeout of 40s passed.
[kubelet-check] It seems like the kubelet isn’t running or healthy.
[kubelet-check] The HTTP call equal to ‘curl -sSL http://localhost:10248/healthz‘ failed with error: Get http://localhost:10248/healthz: dial tcp: lookup localhost on [::1]:53: read udp [::1]:50025->[::1]:53: read: connection refused.
[kubelet-check] It seems like the kubelet isn’t running or healthy.
[kubelet-check] The HTTP call equal to ‘curl -sSL http://localhost:10248/healthz‘ failed with error: Get http://localhost:10248/healthz: dial tcp: lookup localhost on [::1]:53: read udp [::1]:46286->[::1]:53: read: connection refused.
[kubelet-check] It seems like the kubelet isn’t running or healthy.
[kubelet-check] The HTTP call equal to ‘curl -sSL http://localhost:10248/healthz‘ failed with error: Get http://localhost:10248/healthz: dial tcp: lookup localhost on [::1]:53: read udp [::1]:43995->[::1]:53: read: connection refused.
[kubelet-check] It seems like the kubelet isn’t running or healthy.
[kubelet-check] The HTTP call equal to ‘curl -sSL http://localhost:10248/healthz‘ failed with error: Get http://localhost:10248/healthz: dial tcp: lookup localhost on [::1]:53: read udp [::1]:44364->[::1]:53: read: connection refused.
[kubelet-check] It seems like the kubelet isn’t running or healthy.
[kubelet-check] The HTTP call equal to ‘curl -sSL http://localhost:10248/healthz‘ failed with error: Get http://localhost:10248/healthz: dial tcp: lookup localhost on [::1]:53: read udp [::1]:52741->[::1]:53: read: connection refused.
Unfortunately, an error has occurred:
timed out waiting for the condition
This error is likely caused by:
– The kubelet is not running
– The kubelet is unhealthy due to a misconfiguration of the node in some way (required cgroups disabled)
If you are on a systemd-powered system, you can try to troubleshoot the error with the following commands:
– ‘systemctl status kubelet’
– ‘journalctl -xeu kubelet’
Additionally, a control plane component may have crashed or exited when started by the container runtime.
To troubleshoot, list all containers using your preferred container runtimes CLI, e.g. docker.
Here is one example how you may list all Kubernetes containers running in docker:
– ‘docker ps -a | grep kube | grep -v pause’
Once you have found the failing container, you can inspect its logs with:
– ‘docker logs CONTAINERID’
error execution phase wait-control-plane: couldn’t initialize a Kubernetes cluster
The connection to the server raw.githubusercontent.com was refused – did you specify the right host or port?
curl: (6) Could not resolve host: raw.githubusercontent.com; Unknown error
error: no objects passed to apply
大神,摸索了幾天,總算成功搭建了3個master節點的k8s集群,通過kubectl get pods -n kube-system
命令查看pod也都正常運行,但無法通過瀏覽器訪問dashboard控制台,查看dashboard的pod日誌,報這個錯Metric client health check failed: the server could not find the requested resource (get services heapster),望大神可以指點下,謝謝。
集群已经部署完成可以正常运行,不过Master配置了两个节点。目前的问题是试了一下HA,把Master01节点shutdown后,集群就不能用了,执行“kubectl get nodes”会卡死,直到Master01恢复正常。这个跟ETCD没有做集群有关系么?
是的,etcd要求多数可用,最少3实例的集群可以容忍单点故障,参考该链接
测试阶段一个master 一个node 可以吗
你好,询问一下您的这套部署方案是否可以上生产环境?,
修改私有镜像仓库端口后,新增work node时,pull镜像失败。请问要修改什么配置才能够访问私有镜像仓库?
非常感谢!
但是我执行完最后的脚本之后,用kubectl get nodes查看的到只有两个master,
我确信已经改了cluster-info中的ip信息了
还有哪里有配置么?或者可以再加一个master么?
您好,非常荣幸看到你这篇文章,我按照你的脚本进行了编辑,将kubernetes版本升级到了1.13.4,一切貌似都很ok,但是安装了dashboard之后,进行dashboard token登录的时候就出现了Error during global settings reload: {data: “MSG_LOGIN_UNAUTHORIZED_ERROR↵”, status: 401, headers: ƒ, config: {…}, statusText: “Unauthorized”, …}
GET http://dashboard.xxx.com/api/v1/rbac/status 401 (Unauthorized)
(anonymous) @ vendor.bd425c26.js:6
b @ vendor.bd425c26.js:6
c @ vendor.bd425c26.js:6
l @ vendor.bd425c26.js:6
(anonymous) @ vendor.bd425c26.js:6
$digest @ vendor.bd425c26.js:6
$apply @ vendor.bd425c26.js:6
t @ vendor.bd425c26.js:6
s @ vendor.bd425c26.js:6
i @ vendor.bd425c26.js:6
ut @ vendor.bd425c26.js:6
ct @ vendor.bd425c26.js:6
(anonymous) @ vendor.bd425c26.js:6
n @ vendor.bd425c26.js:6
vendor.bd425c26.js:6 Possibly unhandled rejection: {“data”:”MSG_LOGIN_UNAUTHORIZED_ERROR\n”,”status”:401,”config”:{“method”:”GET”,”transformRequest”:[null],”transformResponse”:[null],”jsonpCallbackParam”:”callback”,”url”:”api/v1/rbac/status”,”headers”:{“Accept”:”application/json, text/plain, */*”}},”statusText”:”Unauthorized”,”xhrStatus”:”complete”,”resource”:{}}
(anonymous) @ vendor.bd425c26.js:6
(anonymous) @ vendor.bd425c26.js:6
c @ vendor.bd425c26.js:6
$digest @ vendor.bd425c26.js:6
$apply @ vendor.bd425c26.js:6
l @ vendor.bd425c26.js:6
v @ vendor.bd425c26.js:6
t @ vendor.bd425c26.js:6
load (async)
(anonymous) @ vendor.bd425c26.js:6
b @ vendor.bd425c26.js:6
c @ vendor.bd425c26.js:6
l @ vendor.bd425c26.js:6
(anonymous) @ vendor.bd425c26.js:6
$digest @ vendor.bd425c26.js:6
$apply @ vendor.bd425c26.js:6
t @ vendor.bd425c26.js:6
s @ vendor.bd425c26.js:6
i @ vendor.bd425c26.js:6
ut @ vendor.bd425c26.js:6
ct @ vendor.bd425c26.js:6
(anonymous) @ vendor.bd425c26.js:6
n @ vendor.bd425c26.js:6
按照博主的例子装好了,非常感谢,辛苦博主了,不过注意几点就是用最新的18.09提示不支持,最新的5.1linux内核也是不支持,后面装的朋友注意一下。