
为什么要在Windows上使用Kubernetes?
在过去的几年中,Kubernetes成为事实上的云原生平台,用于在分布式环境中运行容器化服务和应用程序。尽管可以在在云环境(公有云,私有云或混合云)或裸机环境中部署Kubernetes,但有时仍然需要在本地部署和运行Kubernetes。
Kubernetes最初被设计为在Linux环境中部署和使用。但是,大量用户是使用Windows OS作为其日常驱动程序。因此,当微软发布WSL- Linux的Windows子系统时,Windows和Linux环境之间的界线变得不那么明显。
此外,WSL可以满足在Windows上运行Kubernetes的功能!
WSL 不是跑在一个虚拟机里的 Linux。WSL 环境里安装和运行的都是标准的 Linux 程序。当我们运行一个 Linux 程序的时候,这个进程会调用一些 Linux 系统功能调用。WSL 真的提供了这些功能,只是它们被映射为 Windows 操作系统提供的系统功能调用了。所以,WSL 是在 Windows 操作系统内核之外包了一层,使其看上去长得像 Linux 操作系统内核,从而“蒙蔽”了 Linux 应用程序。
下面,我们将简要介绍如何通过结合WSL,安装和使用Kind或Minikube在本地运行Kubernetes集群。
前提条件
- 操作系统:Windows 10 version 2004,Build 19041
- 启用WSL2
- 一旦安装了WSL2,请在Powershell中运行命令wsl.exe –set-default-version 2,将WSL2设置为默认。
- 如果提示”WSL 2 需要更新其内核组件。有关信息,请访问 https://aka.ms/wsl2kernel” ,那你就需要 更新 WSL 2 Linux 内核
- 更新内核,再次在Powershell中运行命令wsl.exe –set-default-version 2,控制台输出“有关与 WSL 2 的主要区别的信息,请访问 https://aka.ms/wsl2”,说明已经将WSL2设置为默认。
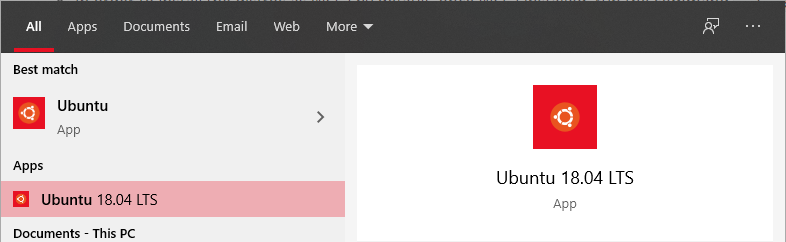
- 打开Windows应用商店,下载安装Ubuntu-18.04
- 安装适用于Windows的Docker Desktop
- 对于Windows的Docker Desktop,现在无需进行任何配置,因为我们将在下文对其进行说明。
WSL2:与Ubuntu结合
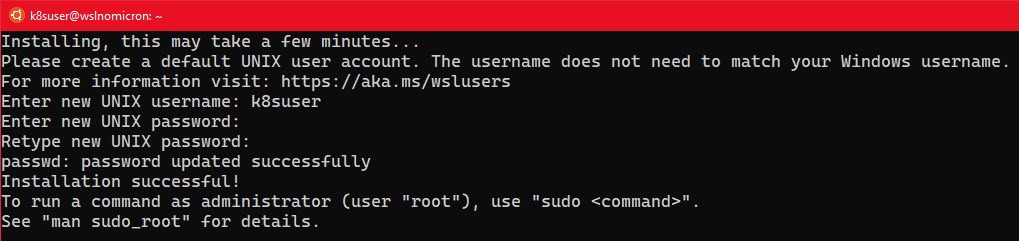
安装完所有组件后,我们单击“ Ubuntu”,它将在运行Ubuntu bash shell的情况下,启动默认的Windows控制台。
像任何普通的Linux一样,你需要创建一个用户并设置一个密码:
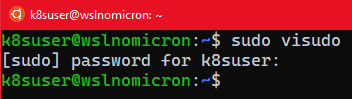
[可选] 更新 sudoers
通常,当我们在本地计算机上工作时,最好更新sudoers并将组设置%sudo为无密码:
# Edit the sudoers with the visudo command sudo visudo # Change the %sudo group to be password-less %sudo ALL=(ALL:ALL) NOPASSWD: ALL # Press CTRL+X to exit # Press Y to save # Press Enter to confirm
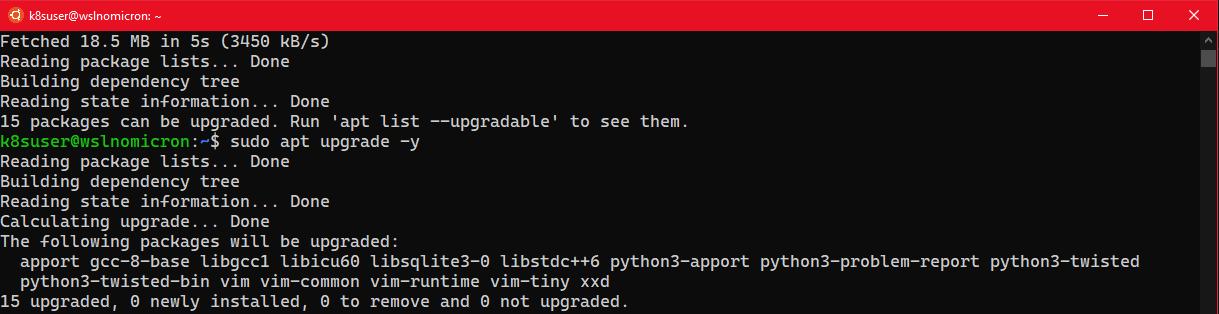
更新Ubuntu
在设置之前Docker Desktop,我们先要更新系统:
# Update the repositories and list of the packages available
sudo apt update
# Update the system based on the packages installed > the "-y" will approve the change automatically
sudo apt upgrade -y
Docker Desktop
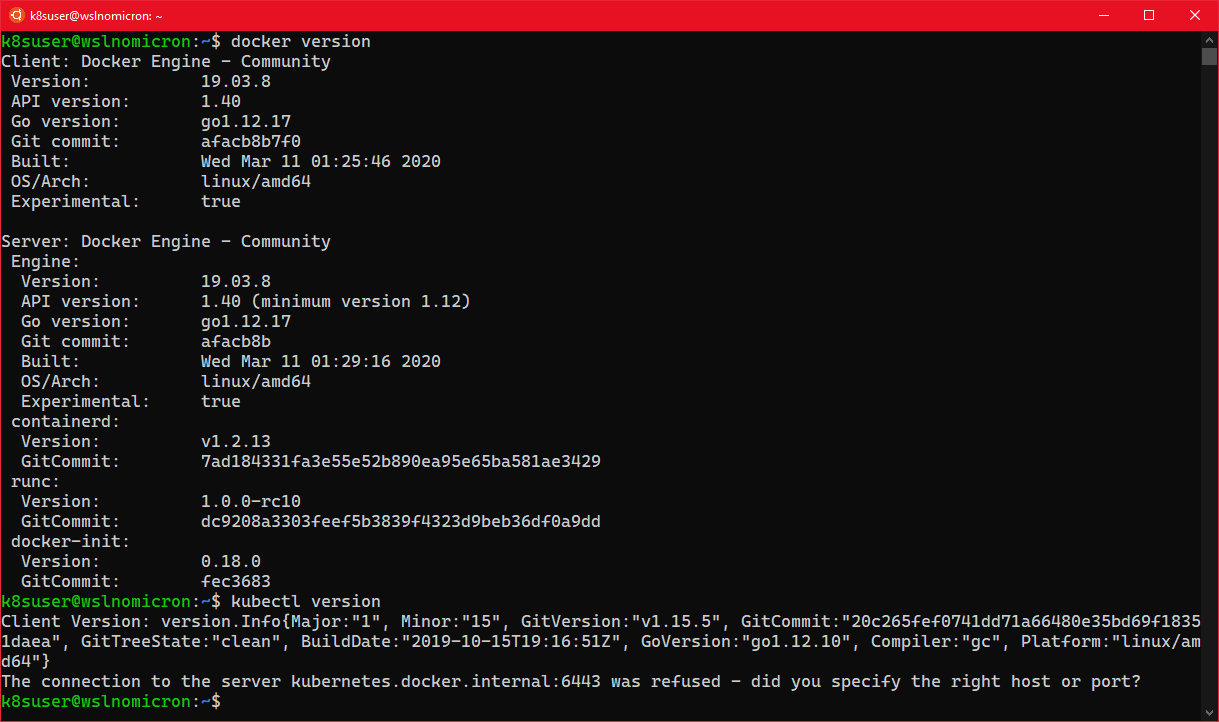
这时候,我们如果输入以下命令:
# Try to see if the docker cli and daemon are installed
docker version
# Same for kubectl
kubectl version
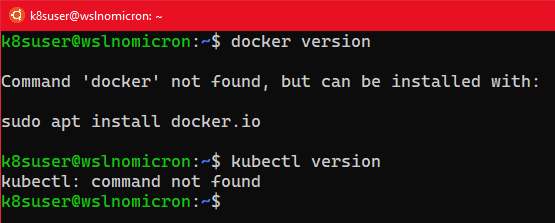
它会出错,如何解决呢?
设置Docker Desktop:启用WSL2集成
解决上面的问题,就需要启动适用于Windows的Docker Desktop。
打开Windows开始菜单,然后键入“ docker”,单击名称以启动应用程序:

选择设置,将会出现一个新窗口:
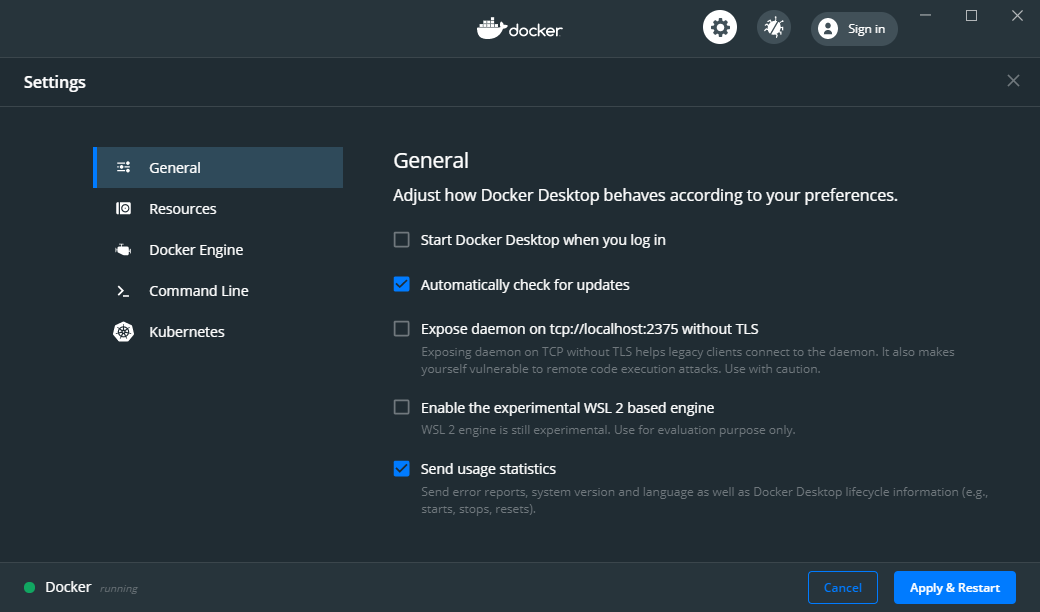
默认情况下,WSL2集成处于未启用状态,因此请单击“ Enable the experimental WSL 2 based engine ”,然后单击“ Apply & Restart ”:
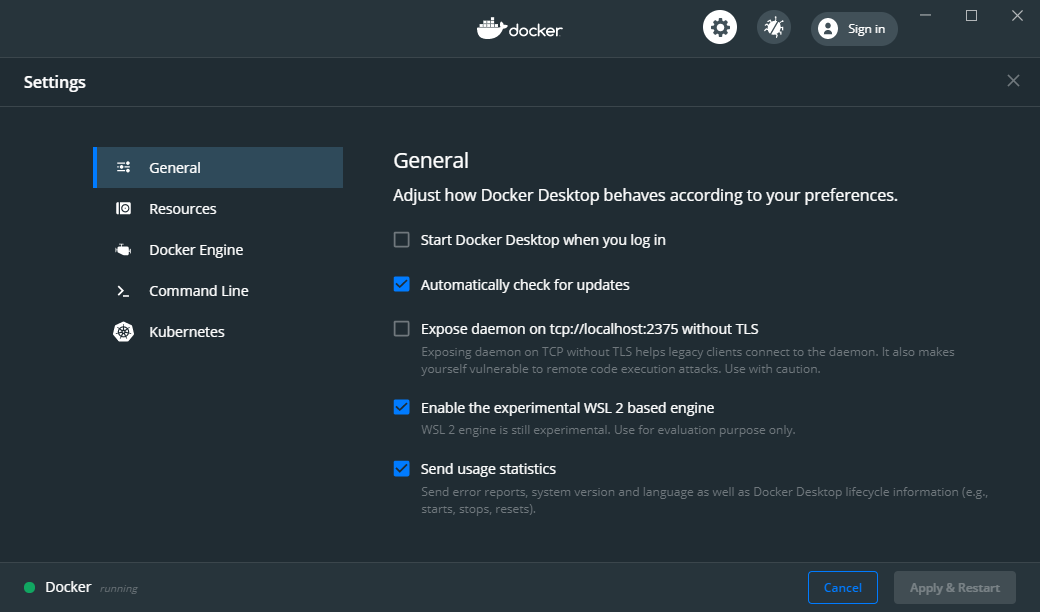
“ Enable the experimental WSL 2 based engine ”功能的作用是在WSL2中创建两个新发行版,其中包含并运行所有必需的后端套接字,守护程序以及CLI工具(docker和kubectl命令)。
尽管如此,这时我们还不能运行docker和kubectl命令。
为了最终能够使用命令,我们还需要告诉Docker Desktop将其自身“ attach ”到我们的Ubuntu 上:
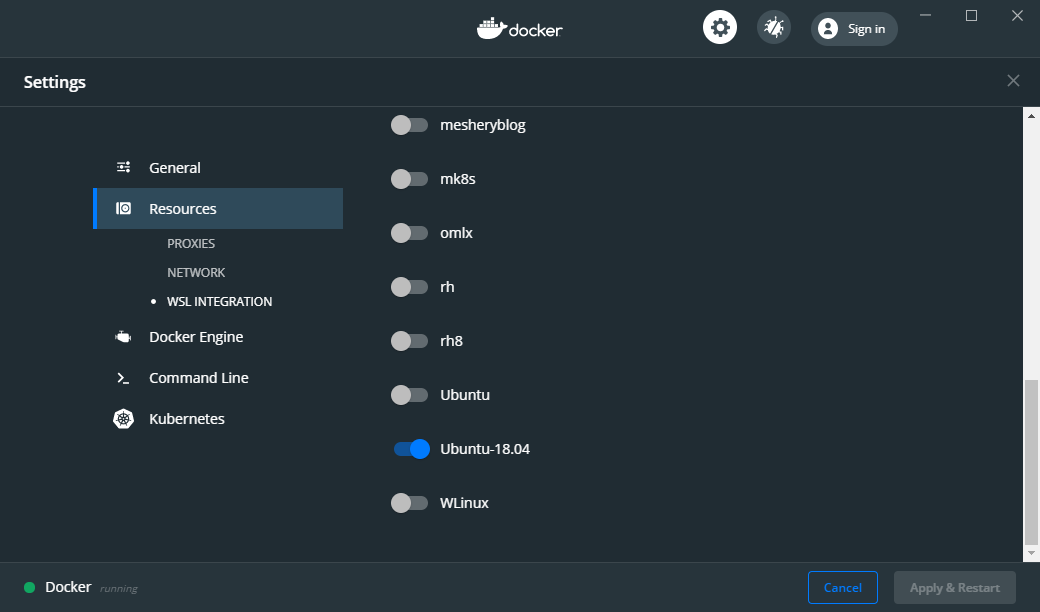
然后,我们回到WSL2终端,看看是否可以(最终)启动命令:
# Try to see if the docker cli and daemon are installed
docker version
# Same for kubectl
kubectl version
提示:如果没有输出以上内容,请重新启动Docker Desktop,并在Powershell中重新启动WSL进程:Restart-Service LxssManager,然后重新启动Ubuntu。
现在完成了基本设置,接下来我们进行Kind的安装。
Kind:创建kubernetes集群
现在,我们已经安装配置了Docker,并且测试也正常。
但是,使用kubectl命令,它提示找不到服务器。
这是正常现象,因为我们没有启用Docker Kubernetes集群。因此,让我们安装Kind并创建我们的第一个集群。
# Download the latest version of Kind
curl -Lo ./kind https://github.com/kubernetes-sigs/kind/releases/download/v0.7.0/kind-$(uname)-amd64
# Make the binary executable
chmod +x ./kind
# Move the binary to your executable path
sudo mv ./kind /usr/local/bin/

Kind:单节点集群
我们准备创建第一个集群:
# Check if the KUBECONFIG is not set
echo $KUBECONFIG
# Check if the .kube directory is created > if not, no need to create it
ls $HOME/.kube
# Create the cluster and give it a name (optional)
kind create cluster --name wslkind
# Check if the .kube has been created and populated with files
ls $HOME/.kube
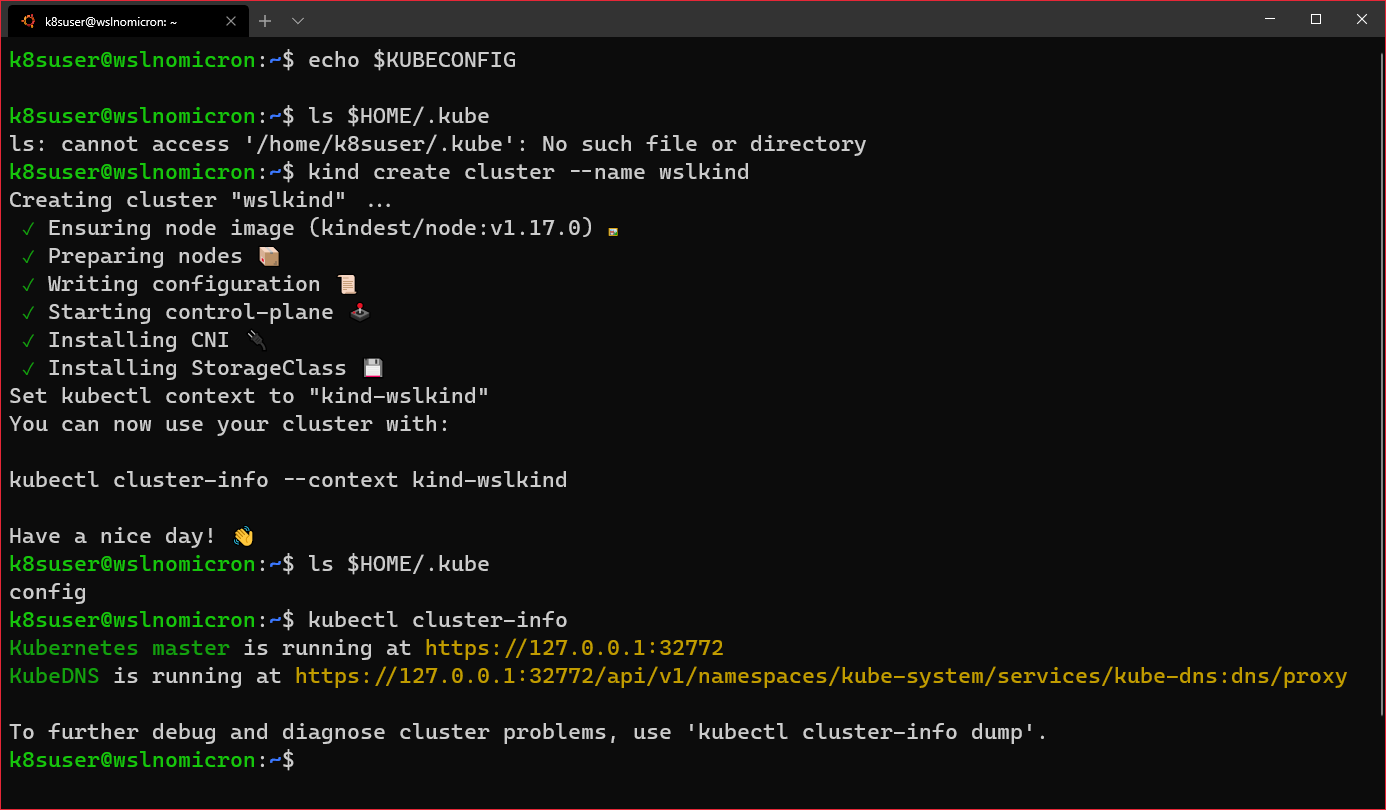
提示:所有图标都显示,表示集群已成功创建
由于我们使用的是Docker Desktop,因此本地网络也是可以被使用。
因此,我们可以在Windows浏览器中打开Kubernetes master的URL:
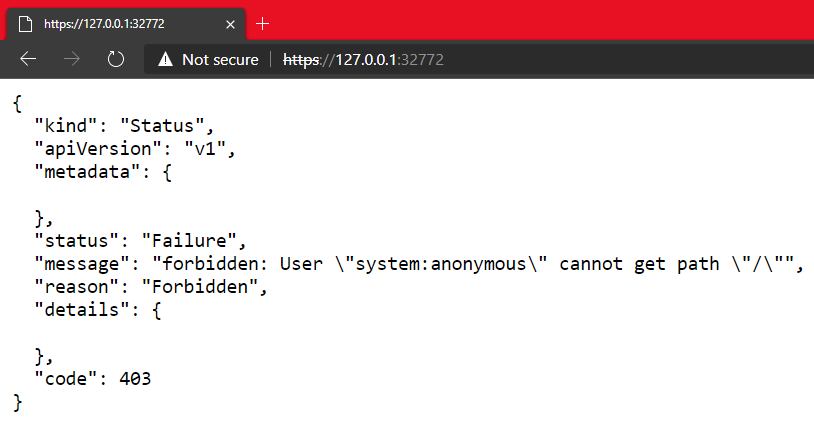
这就是WSL2集成Docker Desktop for Windows的真正优势。
Kind:多节点集群
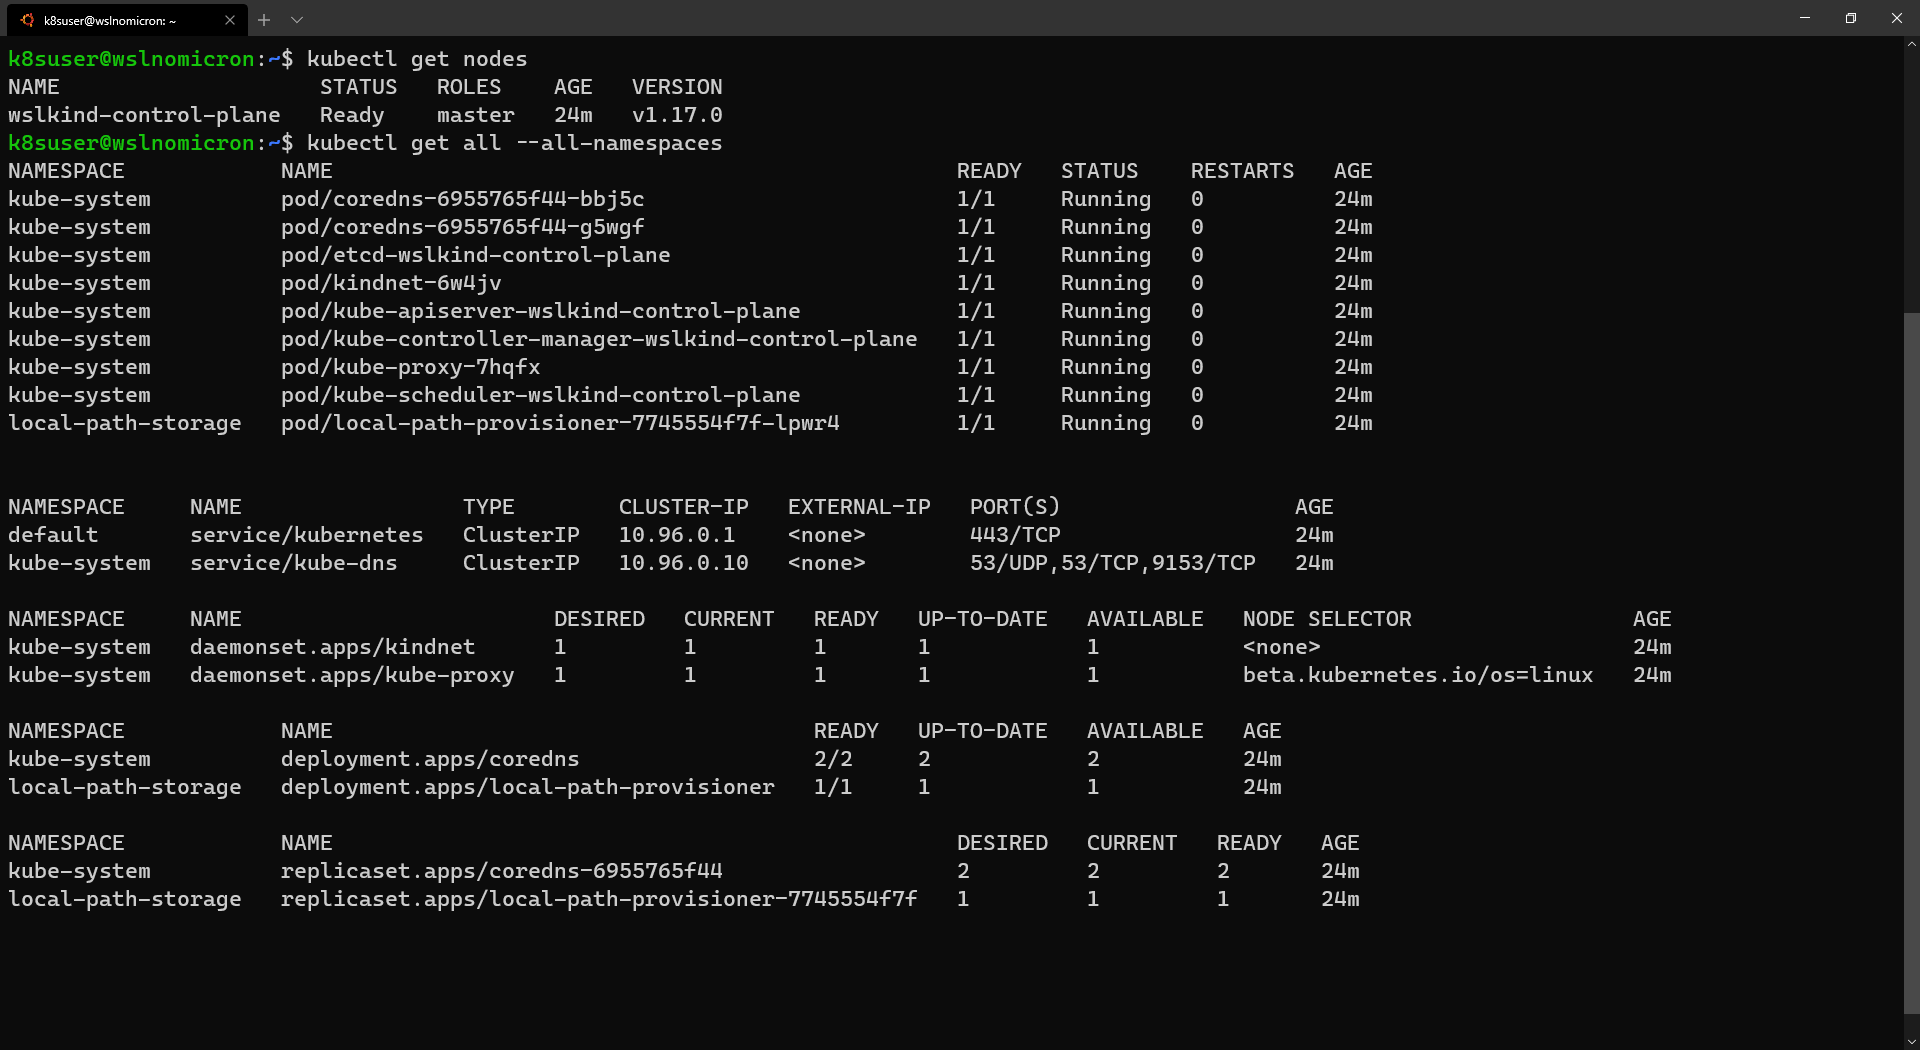
我们的第一个集群已创建,它是一个单节点集群:
# Check how many nodes it created
kubectl get nodes
# Check the services for the whole cluster
kubectl get all --all-namespaces
下面,我们来尝试创建一个多节点集群:
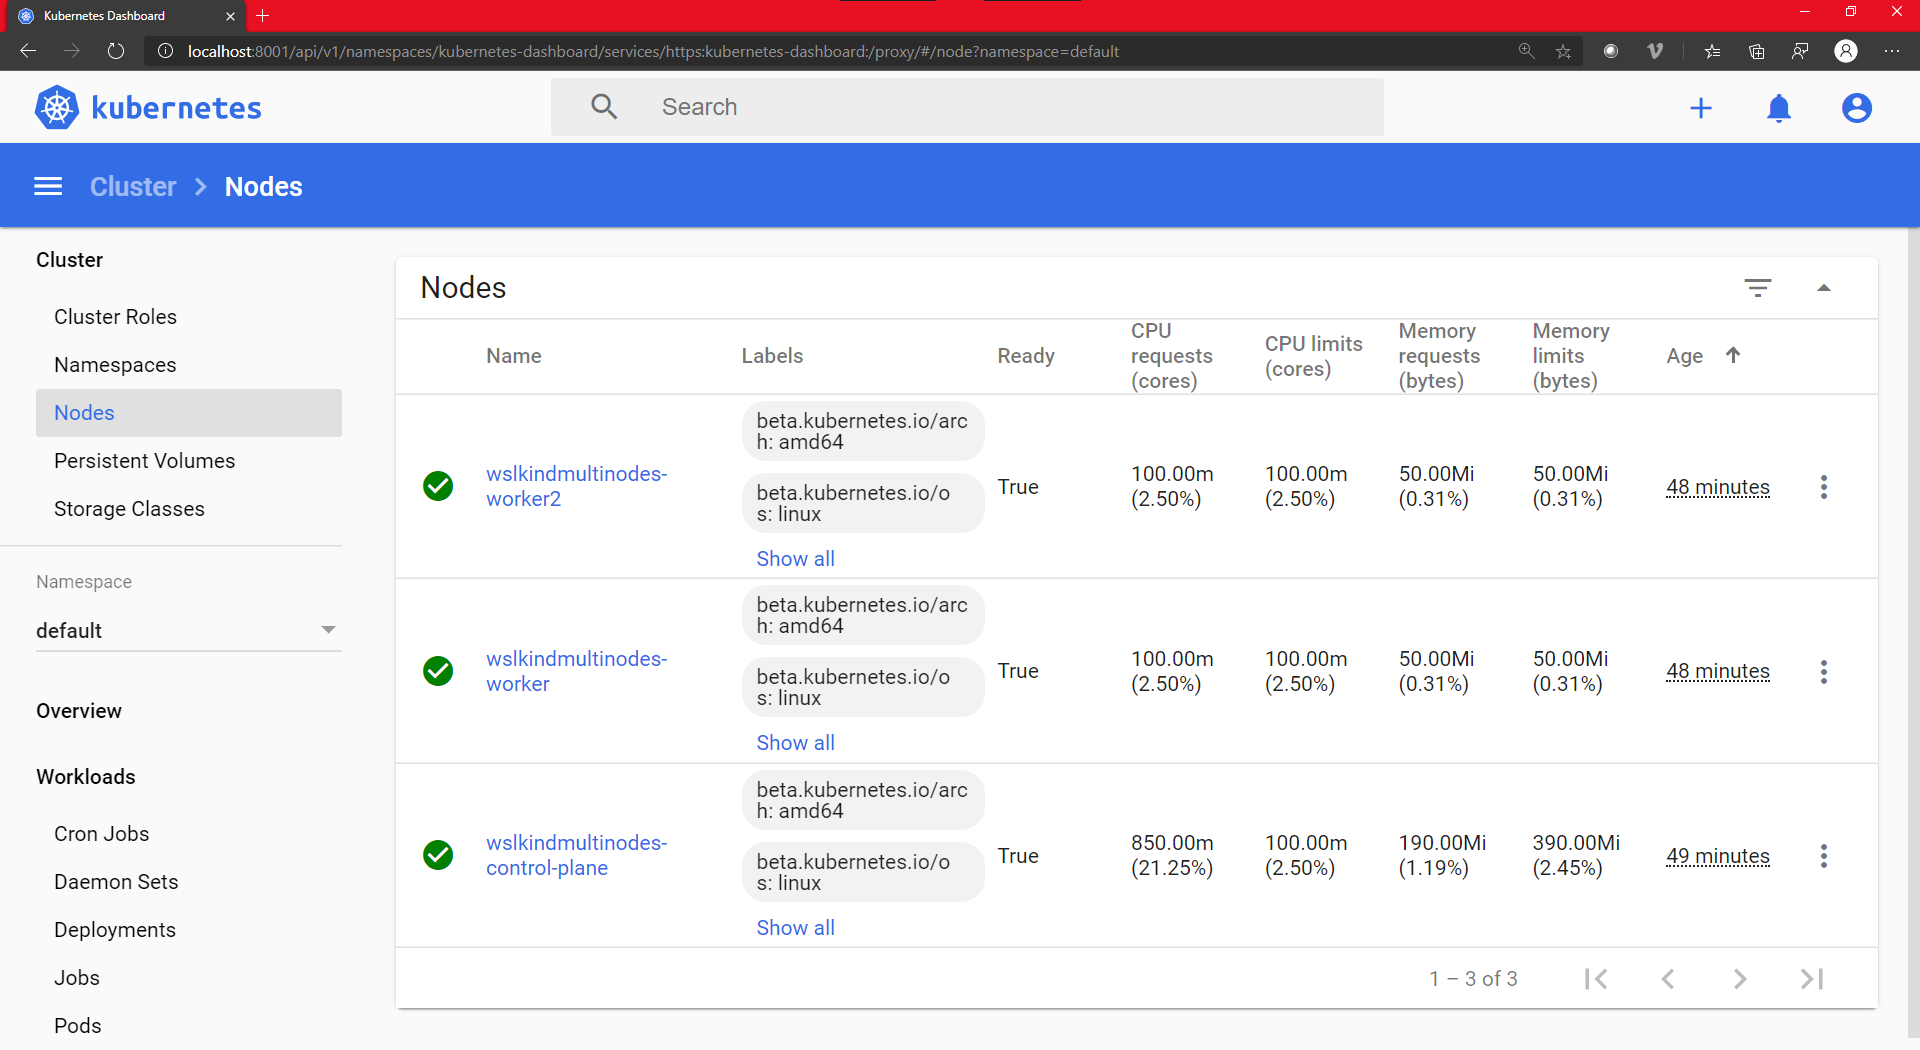
# Delete the existing cluster
kind delete cluster --name wslkind
# Create a config file for a 3 nodes cluster
cat << EOF > kind-3nodes.yaml
kind: Cluster
apiVersion: kind.x-k8s.io/v1alpha4
nodes:
  - role: control-plane
  - role: worker
  - role: worker
EOF
# Create a new cluster with the config file
kind create cluster --name wslkindmultinodes --config ./kind-3nodes.yaml
# Check how many nodes it created
kubectl get nodes

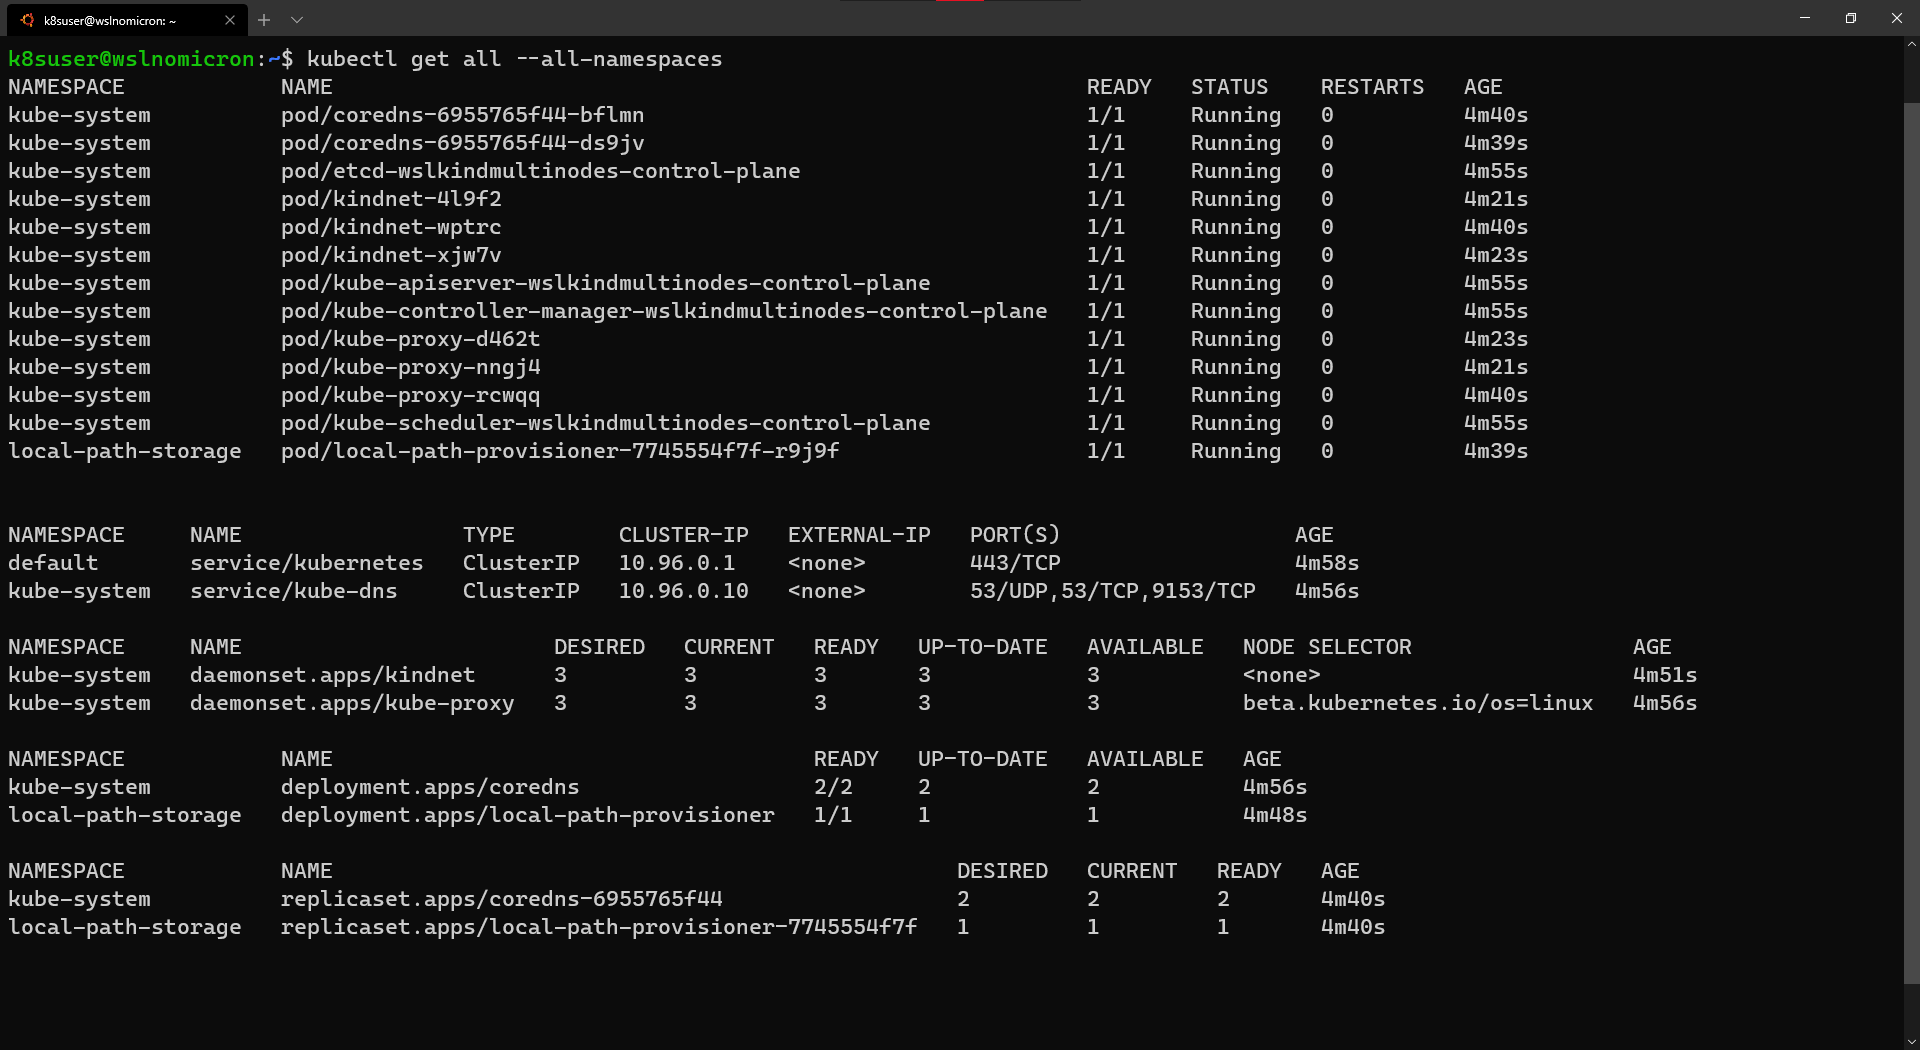
通过以上操作,我们创建了一个三节点集群,如果再看一次服务,我们将看到具有三个副本的集群:
# Check the services for the whole cluster
kubectl get all --all-namespaces
Kind:创建仪表板
使用命令行工作是一件好事。但是,在处理Kubernetes时,我们有时可能希望有一个直观的概览。
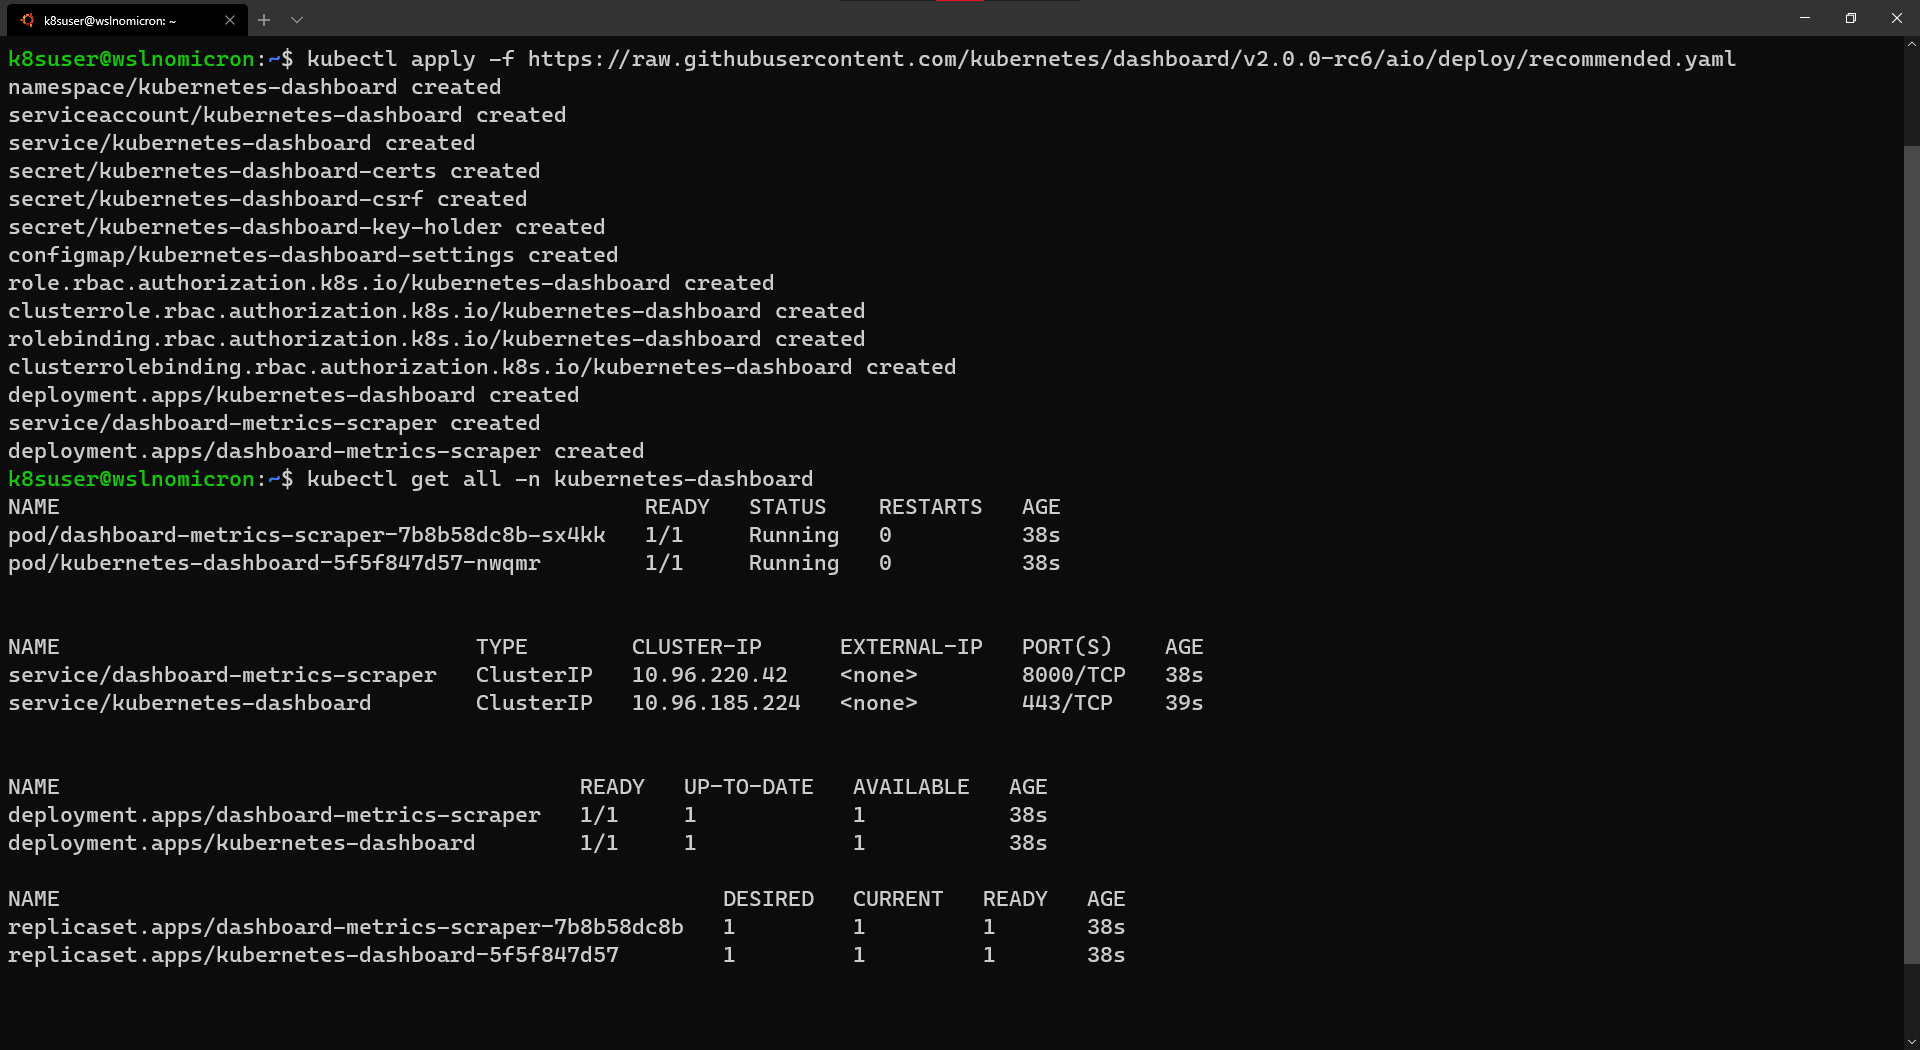
为此,我们需要创建一个Kubernetes Dashboard项目:
# Install the Dashboard application into our cluster
kubectl apply -f https://raw.githubusercontent.com/kubernetes/dashboard/v2.0.0-rc6/aio/deploy/recommended.yaml
# Check the resources it created based on the new namespace created
kubectl get all -n kubernetes-dashboard
其中https://raw.githubusercontent.com/kubernetes/dashboard/v2.0.0-rc6/aio/deploy/recommended.yaml
# Copyright 2017 The Kubernetes Authors. # # Licensed under the Apache License, Version 2.0 (the "License"); # you may not use this file except in compliance with the License. # You may obtain a copy of the License at # # http://www.apache.org/licenses/LICENSE-2.0 # # Unless required by applicable law or agreed to in writing, software # distributed under the License is distributed on an "AS IS" BASIS, # WITHOUT WARRANTIES OR CONDITIONS OF ANY KIND, either express or implied. # See the License for the specific language governing permissions and # limitations under the License. apiVersionv1 kindNamespace metadata namekubernetes-dashboard --- apiVersionv1 kindServiceAccount metadata labels k8s-appkubernetes-dashboard namekubernetes-dashboard namespacekubernetes-dashboard --- kindService apiVersionv1 metadata labels k8s-appkubernetes-dashboard namekubernetes-dashboard namespacekubernetes-dashboard spec ports port443 targetPort8443 selector k8s-appkubernetes-dashboard --- apiVersionv1 kindSecret metadata labels k8s-appkubernetes-dashboard namekubernetes-dashboard-certs namespacekubernetes-dashboard typeOpaque --- apiVersionv1 kindSecret metadata labels k8s-appkubernetes-dashboard namekubernetes-dashboard-csrf namespacekubernetes-dashboard typeOpaque data csrf"" --- apiVersionv1 kindSecret metadata labels k8s-appkubernetes-dashboard namekubernetes-dashboard-key-holder namespacekubernetes-dashboard typeOpaque --- kindConfigMap apiVersionv1 metadata labels k8s-appkubernetes-dashboard namekubernetes-dashboard-settings namespacekubernetes-dashboard --- kindRole apiVersionrbac.authorization.k8s.io/v1 metadata labels k8s-appkubernetes-dashboard namekubernetes-dashboard namespacekubernetes-dashboard rules # Allow Dashboard to get, update and delete Dashboard exclusive secrets. apiGroups"" resources"secrets" resourceNames"kubernetes-dashboard-key-holder" "kubernetes-dashboard-certs" "kubernetes-dashboard-csrf" verbs"get" "update" "delete" # Allow Dashboard to get and update 'kubernetes-dashboard-settings' config map. apiGroups"" resources"configmaps" resourceNames"kubernetes-dashboard-settings" verbs"get" "update" # Allow Dashboard to get metrics. apiGroups"" resources"services" resourceNames"heapster" "dashboard-metrics-scraper" verbs"proxy" apiGroups"" resources"services/proxy" resourceNames"heapster" "http:heapster:" "https:heapster:" "dashboard-metrics-scraper" "http:dashboard-metrics-scraper" verbs"get" --- kindClusterRole apiVersionrbac.authorization.k8s.io/v1 metadata labels k8s-appkubernetes-dashboard namekubernetes-dashboard rules # Allow Metrics Scraper to get metrics from the Metrics server apiGroups"metrics.k8s.io" resources"pods" "nodes" verbs"get" "list" "watch" --- apiVersionrbac.authorization.k8s.io/v1 kindRoleBinding metadata labels k8s-appkubernetes-dashboard namekubernetes-dashboard namespacekubernetes-dashboard roleRef apiGrouprbac.authorization.k8s.io kindRole namekubernetes-dashboard subjects kindServiceAccount namekubernetes-dashboard namespacekubernetes-dashboard --- apiVersionrbac.authorization.k8s.io/v1 kindClusterRoleBinding metadata namekubernetes-dashboard roleRef apiGrouprbac.authorization.k8s.io kindClusterRole namekubernetes-dashboard subjects kindServiceAccount namekubernetes-dashboard namespacekubernetes-dashboard --- kindDeployment apiVersionapps/v1 metadata labels k8s-appkubernetes-dashboard namekubernetes-dashboard namespacekubernetes-dashboard spec replicas1 revisionHistoryLimit10 selector matchLabels k8s-appkubernetes-dashboard template metadata labels k8s-appkubernetes-dashboard spec containers namekubernetes-dashboard imagekubernetesui/dashboardv2.0.0-rc6 imagePullPolicyAlways ports containerPort8443 protocolTCP args --auto-generate-certificates --namespace=kubernetes-dashboard # Uncomment the following line to manually specify Kubernetes API server Host # If not specified, Dashboard will attempt to auto discover the API server and connect # to it. Uncomment only if the default does not work. # - --apiserver-host=http://my-address:port volumeMounts namekubernetes-dashboard-certs mountPath/certs # Create on-disk volume to store exec logs mountPath/tmp nametmp-volume livenessProbe httpGet schemeHTTPS path/ port8443 initialDelaySeconds30 timeoutSeconds30 securityContext allowPrivilegeEscalationfalse readOnlyRootFilesystemtrue runAsUser1001 runAsGroup2001 volumes namekubernetes-dashboard-certs secret secretNamekubernetes-dashboard-certs nametmp-volume emptyDir serviceAccountNamekubernetes-dashboard nodeSelector "beta.kubernetes.io/os"linux # Comment the following tolerations if Dashboard must not be deployed on master tolerations keynode-role.kubernetes.io/master effectNoSchedule --- kindService apiVersionv1 metadata labels k8s-appdashboard-metrics-scraper namedashboard-metrics-scraper namespacekubernetes-dashboard spec ports port8000 targetPort8000 selector k8s-appdashboard-metrics-scraper --- kindDeployment apiVersionapps/v1 metadata labels k8s-appdashboard-metrics-scraper namedashboard-metrics-scraper namespacekubernetes-dashboard spec replicas1 revisionHistoryLimit10 selector matchLabels k8s-appdashboard-metrics-scraper template metadata labels k8s-appdashboard-metrics-scraper annotations seccomp.security.alpha.kubernetes.io/pod'runtime/default' spec containers namedashboard-metrics-scraper imagekubernetesui/metrics-scraperv1.0.3 ports containerPort8000 protocolTCP livenessProbe httpGet schemeHTTP path/ port8000 initialDelaySeconds30 timeoutSeconds30 volumeMounts mountPath/tmp nametmp-volume securityContext allowPrivilegeEscalationfalse readOnlyRootFilesystemtrue runAsUser1001 runAsGroup2001 serviceAccountNamekubernetes-dashboard nodeSelector "beta.kubernetes.io/os"linux # Comment the following tolerations if Dashboard must not be deployed on master tolerations keynode-role.kubernetes.io/master effectNoSchedule volumes nametmp-volume emptyDir
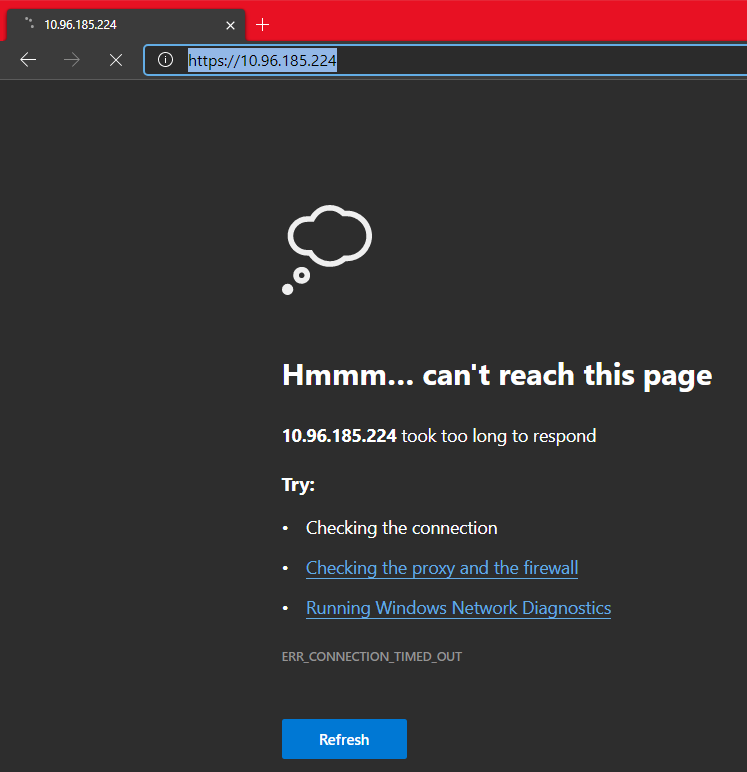
如果使用ClusterIP创建服务时,在Windows浏览器中键入URL,则无法访问该服务:
因此,我们需要创建一个临时代理:
# Start a kubectl proxy
kubectl proxy
# Enter the URL on your browser: http://localhost:8001/api/v1/namespaces/kubernetes-dashboard/services/https:kubernetes-dashboard:/proxy/
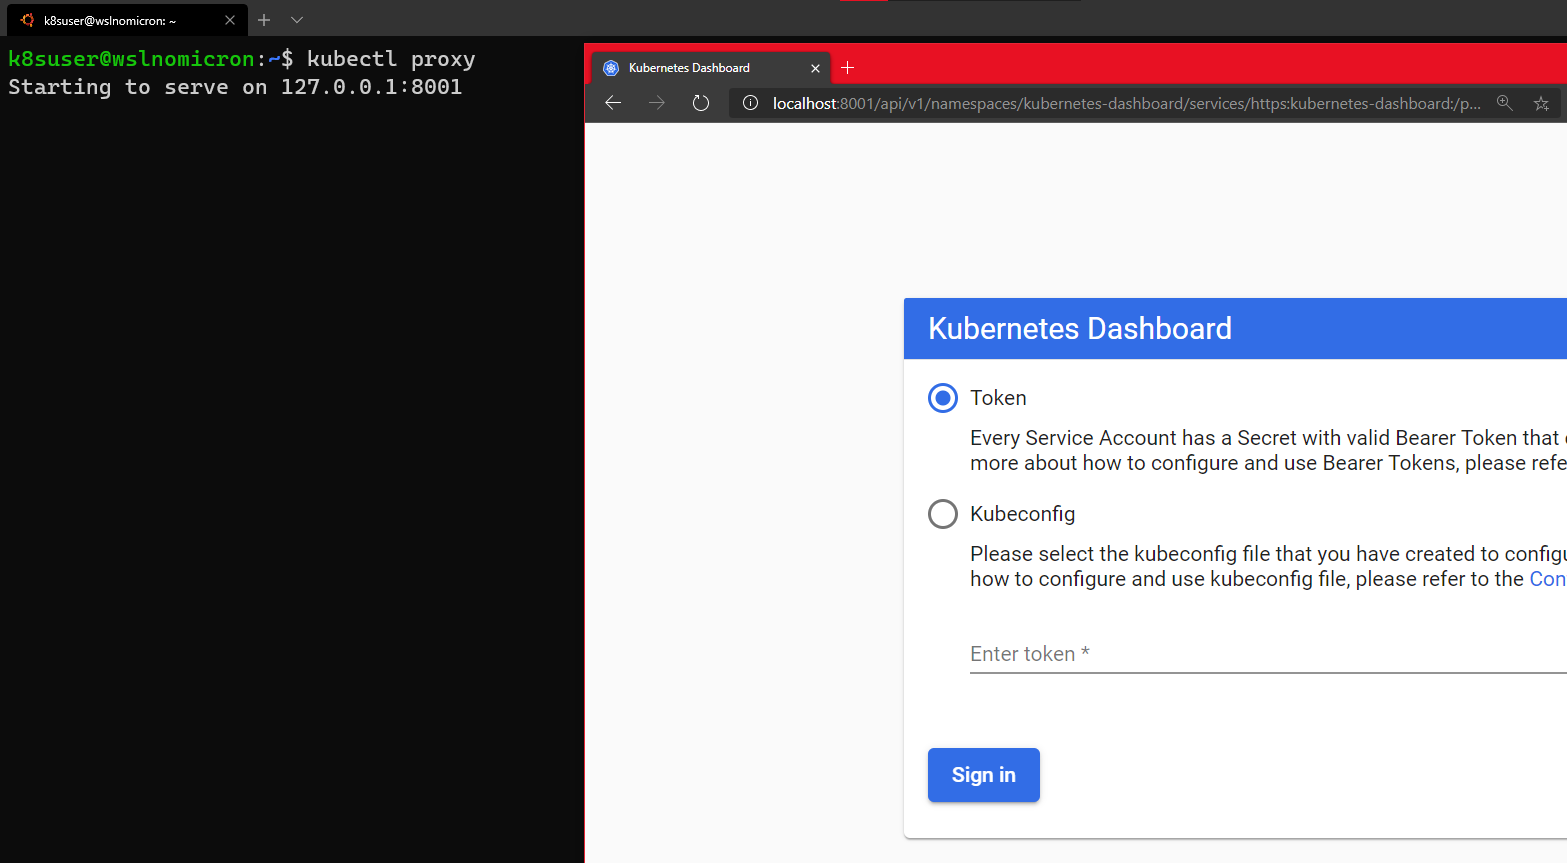
我们可以输入一个令牌,也可以输入来自集群的kubeconfig文件。
如果尝试使用kubeconfig登录,则将显示错误“ Internal error (500): Not enough data to create auth info structure ”。这是由于kubeconfig文件中缺少凭据。
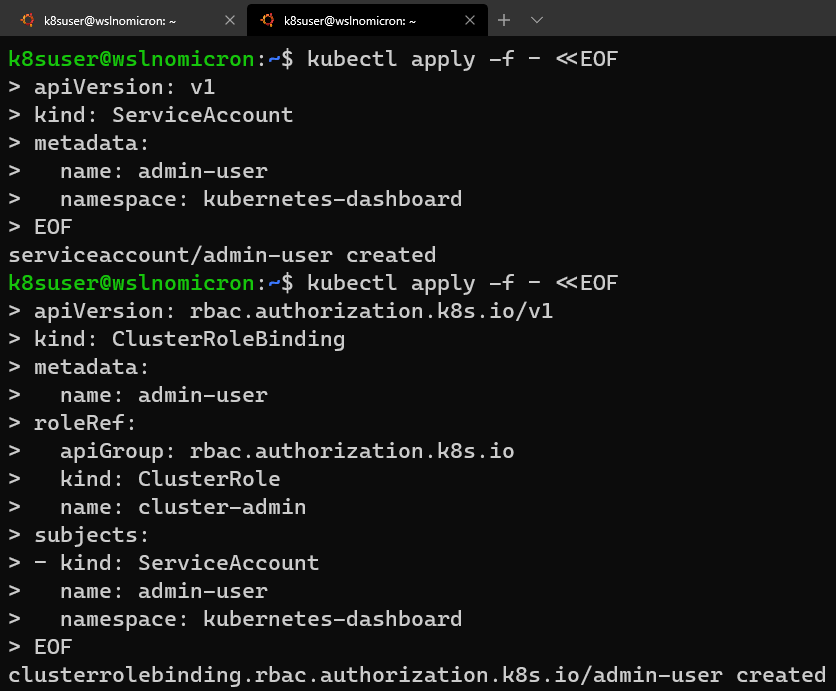
因此,为避免出现以上的错误,请使用推荐的RBAC方法。
让我们打开一个新的WSL2会话:
# Create a new ServiceAccount
kubectl apply -f - <<EOF
apiVersion: v1
kind: ServiceAccount
metadata:
  name: admin-user
  namespace: kubernetes-dashboard
EOF
# Create a ClusterRoleBinding for the ServiceAccount
kubectl apply -f - <<EOF
apiVersion: rbac.authorization.k8s.io/v1
kind: ClusterRoleBinding
metadata:
  name: admin-user
roleRef:
  apiGroup: rbac.authorization.k8s.io
  kind: ClusterRole
  name: cluster-admin
subjects:
- kind: ServiceAccount
  name: admin-user
  namespace: kubernetes-dashboard
EOF
# Get the Token for the ServiceAccount
kubectl -n kubernetes-dashboard describe secret $(kubectl -n kubernetes-dashboard get secret | grep admin-user | awk '{print $1}')
# Copy the token and copy it into the Dashboard login and press "Sign in"
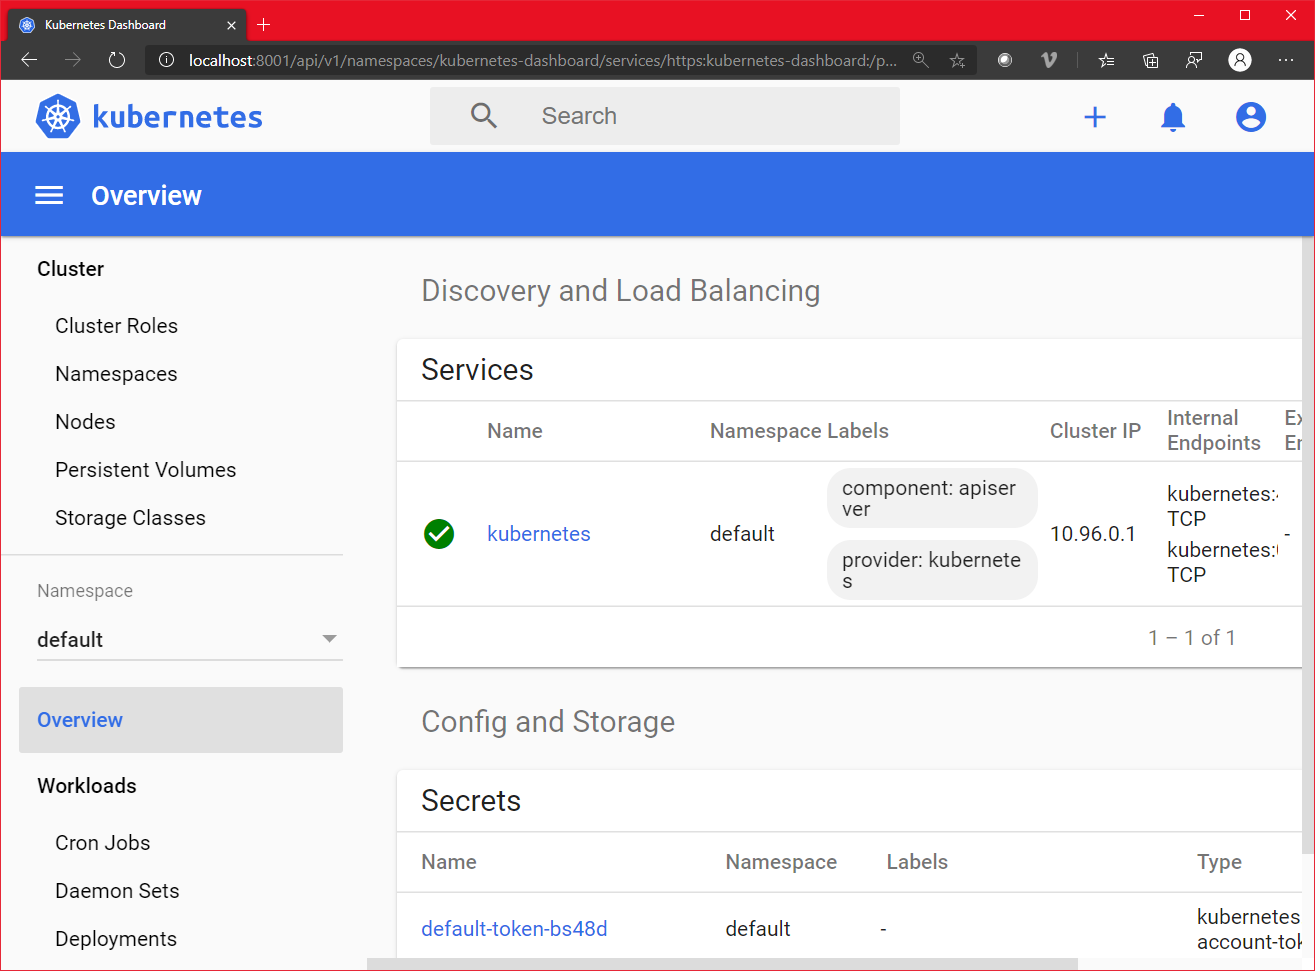
成功了!仪表板还列出了我们的节点:
Minikube:创建kubernetes集群
# Download the latest version of Minikube
curl -Lo minikube https://storage.googleapis.com/minikube/releases/latest/minikube-linux-amd64
# Make the binary executable
chmod +x ./minikube
# Move the binary to your executable path
sudo mv ./minikube /usr/local/bin/

Minikube:更新主机
使用–driver=none,在主机和Docker上运行Minikube。
值得注意的是,运行Kubernetes v 1.18时,我们会收到“conntrack需要被安装”的提示:
# Create a minikube one node cluster
minikube start --driver=none

通过安装缺少的软件包来解决此问题:
# Install the conntrack package
sudo apt install -y conntrack
再次启动minikube:
# Create a minikube one node cluster
minikube start --driver=none
# We got a permissions error > try again with sudo
sudo minikube start --driver=none
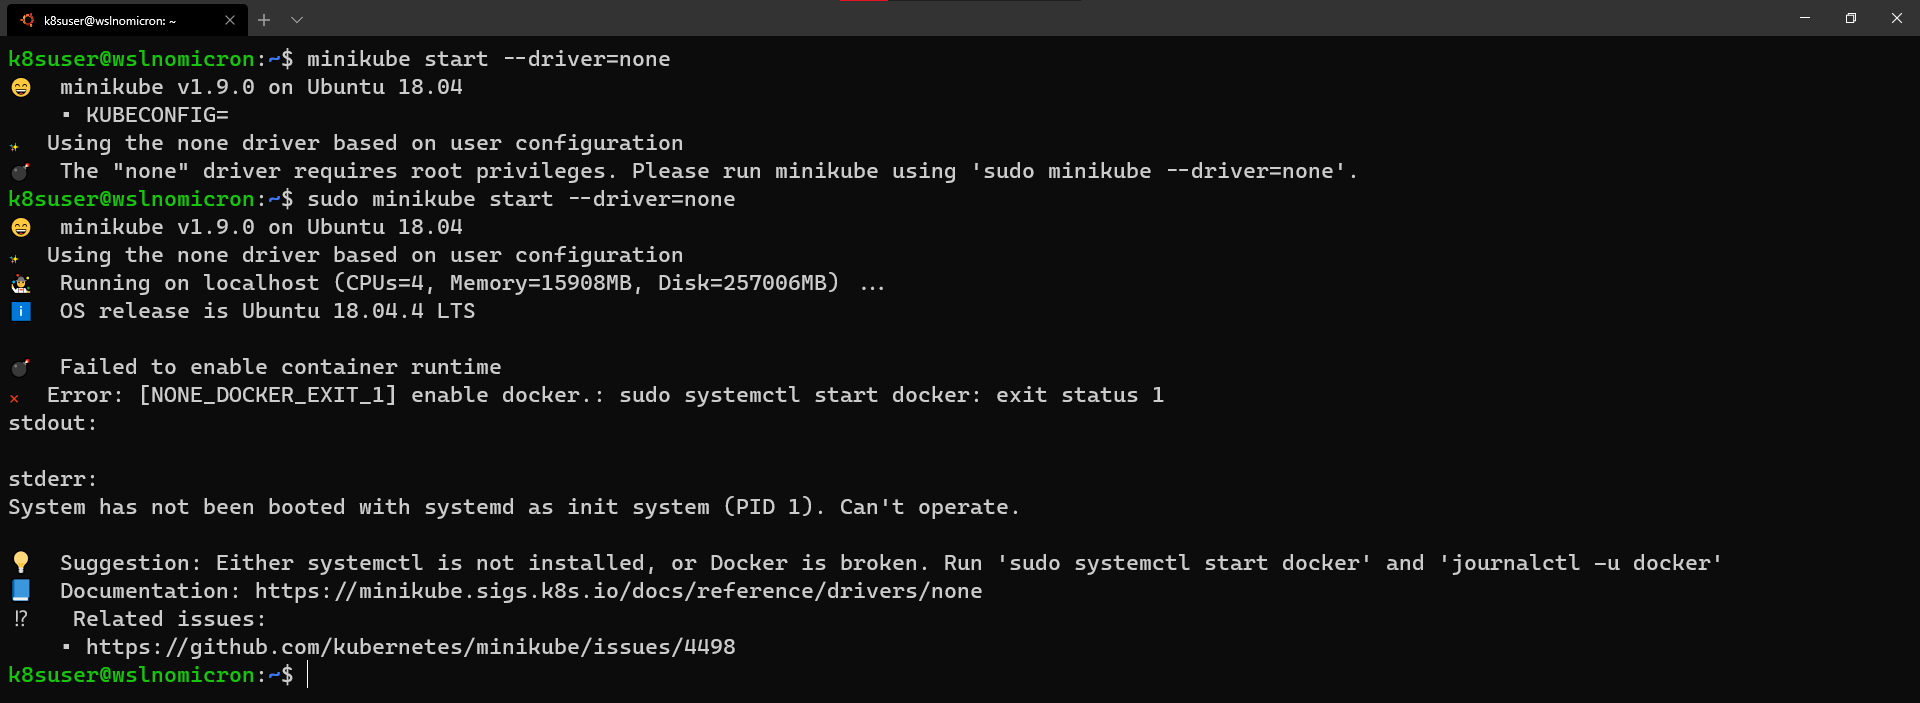
但,又报错“System has not been booted with systemd…”,如何解决呢?
Minikube:启用Systemd
为了在WSL2使Systemd,我们将使用由丹尼尔·卢埃林提供的脚本。
以下是命令:
# Install the needed packages
sudo apt install -yqq daemonize dbus-user-session fontconfig

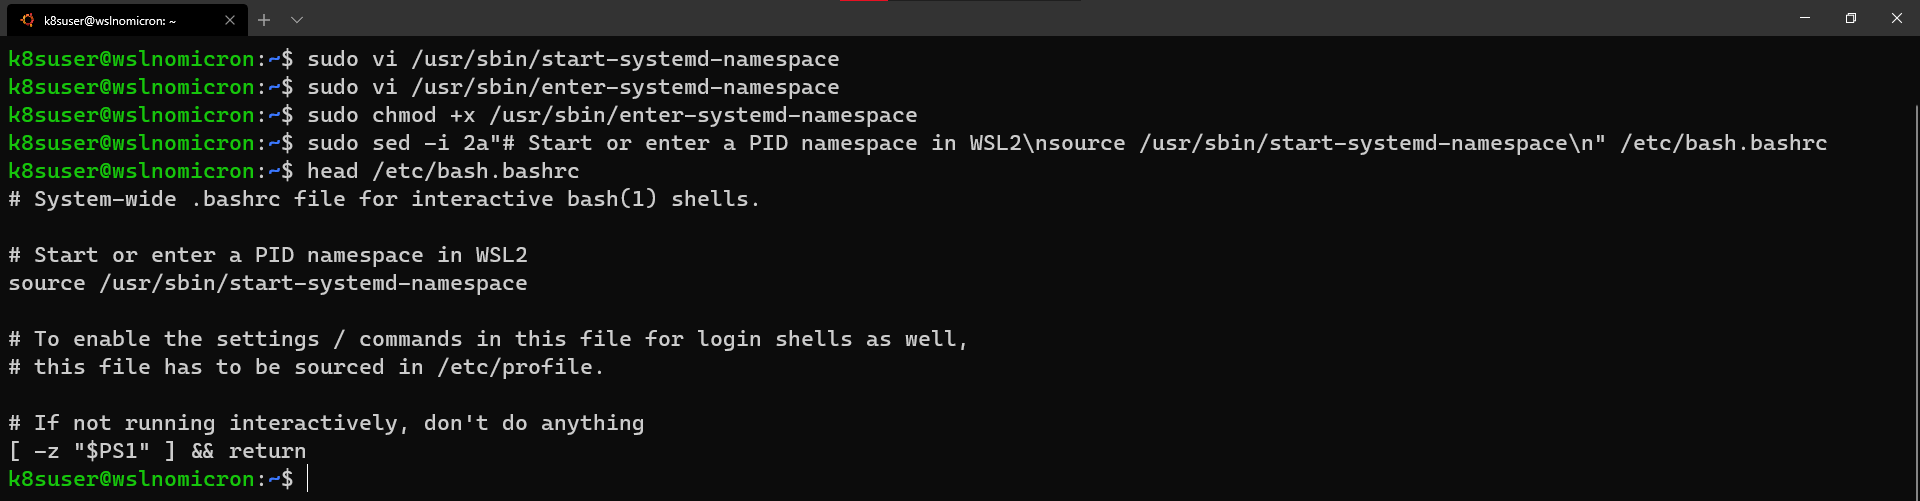
# Create the start-systemd-namespace script
sudo vi /usr/sbin/start-systemd-namespace
#!/bin/bash

SYSTEMD_PID=$(ps -ef | grep '/lib/systemd/systemd --system-unit=basic.target$' | grep -v unshare | awk '{print $2}')
if [ -z "$SYSTEMD_PID" ] || [ "$SYSTEMD_PID" != "1" ]; then
    export PRE_NAMESPACE_PATH="$PATH"
    (set -o posix; set) | \
        grep -v "^BASH" | \
        grep -v "^DIRSTACK=" | \
        grep -v "^EUID=" | \
        grep -v "^GROUPS=" | \
        grep -v "^HOME=" | \
        grep -v "^HOSTNAME=" | \
        grep -v "^HOSTTYPE=" | \
        grep -v "^IFS='.*"$'\n'"'" | \
        grep -v "^LANG=" | \
        grep -v "^LOGNAME=" | \
        grep -v "^MACHTYPE=" | \
        grep -v "^NAME=" | \
        grep -v "^OPTERR=" | \
        grep -v "^OPTIND=" | \
        grep -v "^OSTYPE=" | \
        grep -v "^PIPESTATUS=" | \
        grep -v "^POSIXLY_CORRECT=" | \
        grep -v "^PPID=" | \
        grep -v "^PS1=" | \
        grep -v "^PS4=" | \
        grep -v "^SHELL=" | \
        grep -v "^SHELLOPTS=" | \
        grep -v "^SHLVL=" | \
        grep -v "^SYSTEMD_PID=" | \
        grep -v "^UID=" | \
        grep -v "^USER=" | \
        grep -v "^_=" | \
        cat - > "$HOME/.systemd-env"
    echo "PATH='$PATH'" >> "$HOME/.systemd-env"
    exec sudo /usr/sbin/enter-systemd-namespace "$BASH_EXECUTION_STRING"
fi
if [ -n "$PRE_NAMESPACE_PATH" ]; then
    export PATH="$PRE_NAMESPACE_PATH"
fi
# Create the enter-systemd-namespace
sudo vi /usr/sbin/enter-systemd-namespace
#!/bin/bash

if [ "$UID" != 0 ]; then
    echo "You need to run $0 through sudo"
    exit 1
fi

SYSTEMD_PID="$(ps -ef | grep '/lib/systemd/systemd --system-unit=basic.target$' | grep -v unshare | awk '{print $2}')"
if [ -z "$SYSTEMD_PID" ]; then
    /usr/sbin/daemonize /usr/bin/unshare --fork --pid --mount-proc /lib/systemd/systemd --system-unit=basic.target
    while [ -z "$SYSTEMD_PID" ]; do
        SYSTEMD_PID="$(ps -ef | grep '/lib/systemd/systemd --system-unit=basic.target$' | grep -v unshare | awk '{print $2}')"
    done
fi

if [ -n "$SYSTEMD_PID" ] && [ "$SYSTEMD_PID" != "1" ]; then
    if [ -n "$1" ] && [ "$1" != "bash --login" ] && [ "$1" != "/bin/bash --login" ]; then
        exec /usr/bin/nsenter -t "$SYSTEMD_PID" -a \
            /usr/bin/sudo -H -u "$SUDO_USER" \
            /bin/bash -c 'set -a; source "$HOME/.systemd-env"; set +a; exec bash -c '"$(printf "%q" "$@")"
    else
        exec /usr/bin/nsenter -t "$SYSTEMD_PID" -a \
            /bin/login -p -f "$SUDO_USER" \
            $(/bin/cat "$HOME/.systemd-env" | grep -v "^PATH=")
    fi
    echo "Existential crisis"
fi
# Edit the permissions of the enter-systemd-namespace script
sudo chmod +x /usr/sbin/enter-systemd-namespace
# Edit the bash.bashrc file
sudo sed -i 2a"# Start or enter a PID namespace in WSL2\nsource /usr/sbin/start-systemd-namespace\n" /etc/bash.bashrc
最后,退出并启动新minikube的会话。不需要停止WSL2,一个新的会话就足够了:

Minikube:单节点kubernetes集群
我们准备创建第一个集群:
# Check if the KUBECONFIG is not set
echo $KUBECONFIG
# Check if the .kube directory is created > if not, no need to create it
ls $HOME/.kube
# Check if the .minikube directory is created > if yes, delete it
ls $HOME/.minikube
# Create the cluster with sudo
sudo minikube start --driver=none
为了让我们的用户(而非sudo方式)能够使用kubectl,Minikube建议运行以下chown命令:
# Change the owner of the .kube and .minikube directories
sudo chown -R $USER $HOME/.kube $HOME/.minikube
# Check the access and if the cluster is running
kubectl cluster-info
# Check the resources created
kubectl get all --all-namespaces
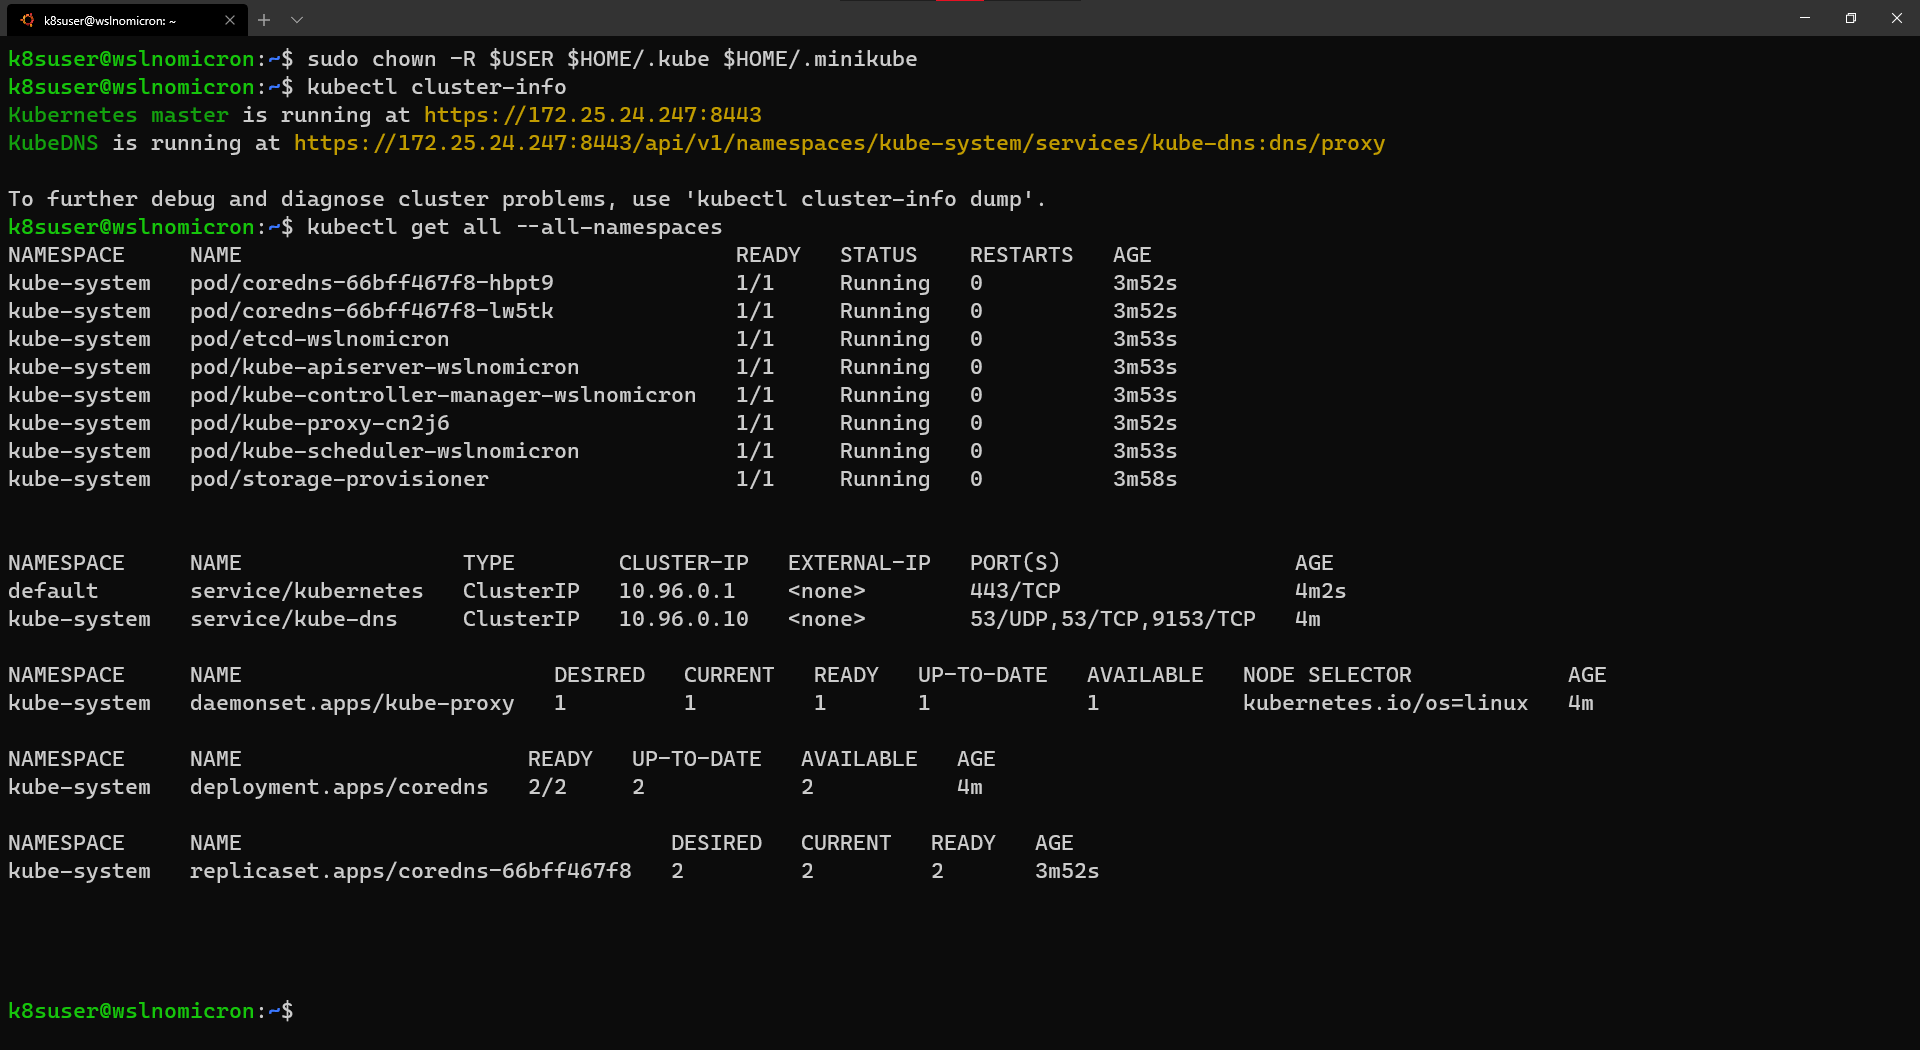
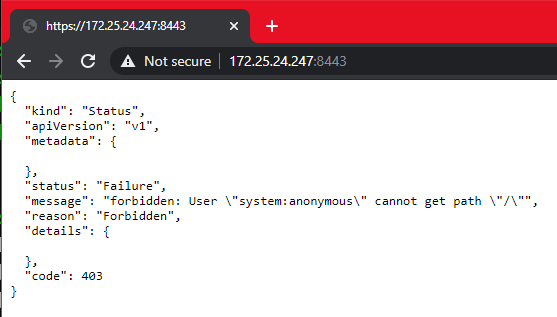
集群已成功创建。我们看到Minikube使用了WSL2的 IP,这很有用,原因有几个,其中之一是我们可以在Windows浏览器中打开Kubernetes master的URL:
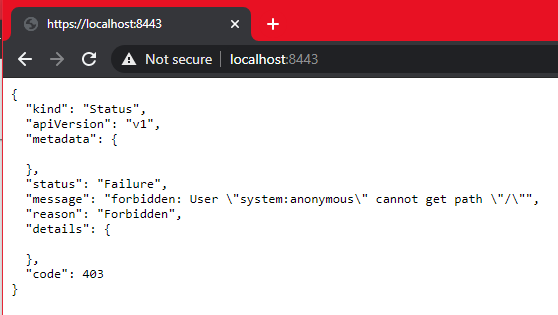
Minikube与WSL2集成的真正优势在于,端口8443一旦在WSL2上打开,便会实际上将其转发至Windows,因此无需记住IP地址,我们可以通过localhost方式访问Kubernetes master的URL :
Minikube:Kubernetes的仪表板
Minikube嵌入了Kubernetes仪表板。有了它,运行和访问仪表板非常简单:
# Enable the Dashboard service
sudo minikube dashboard
# Access the Dashboard from a browser on Windows side
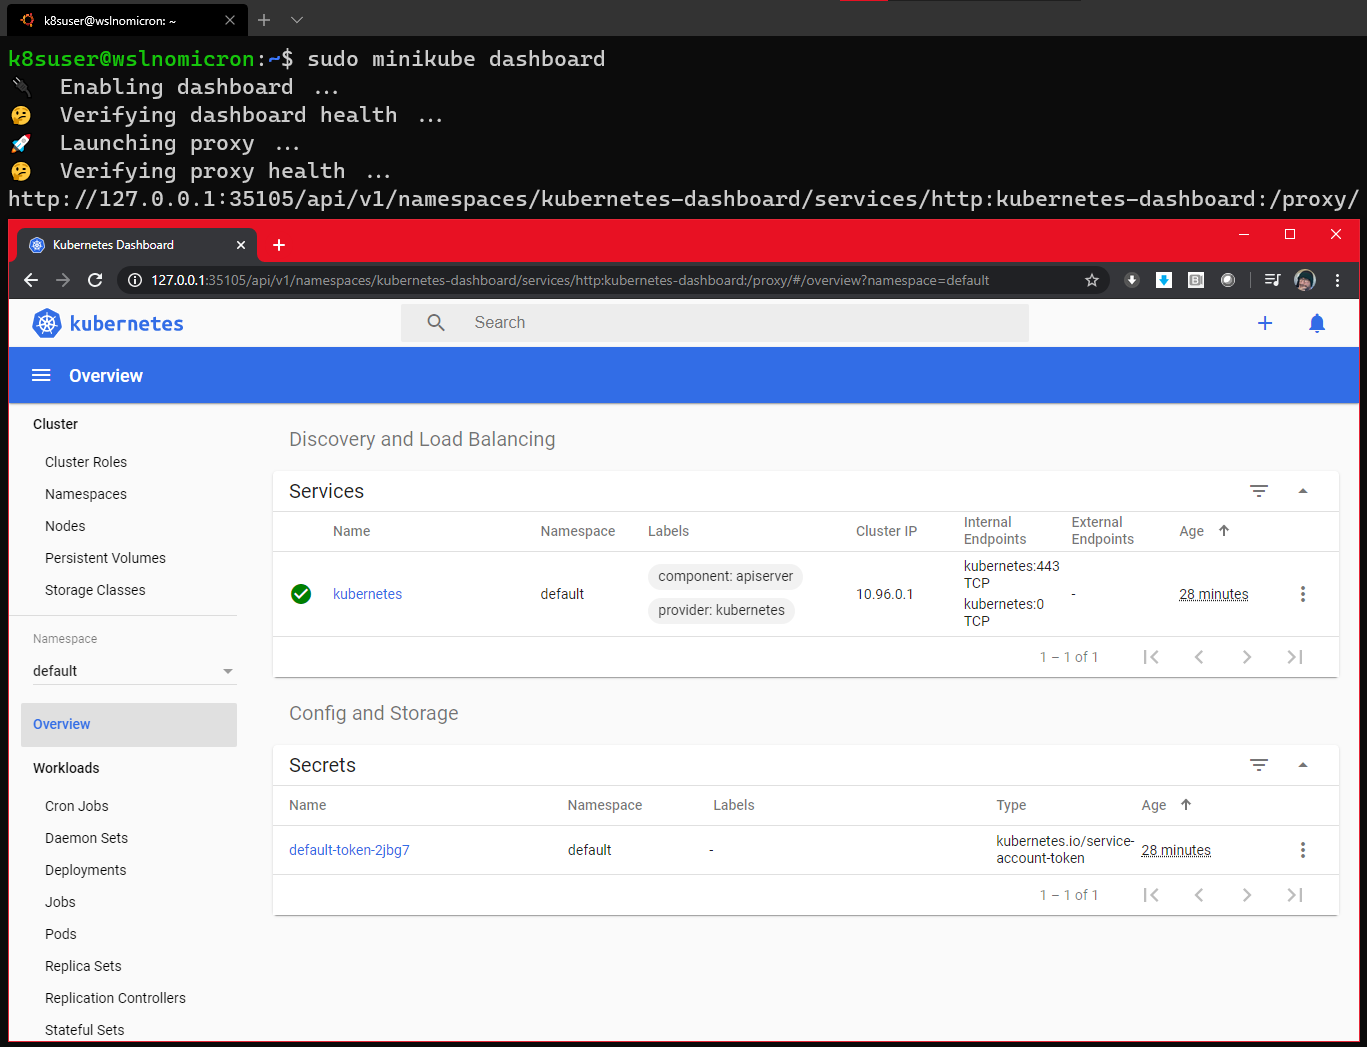
该命令还会创建一个代理,这意味着一旦我们通过按结束命令,CTRL+C将无法再访问仪表板。
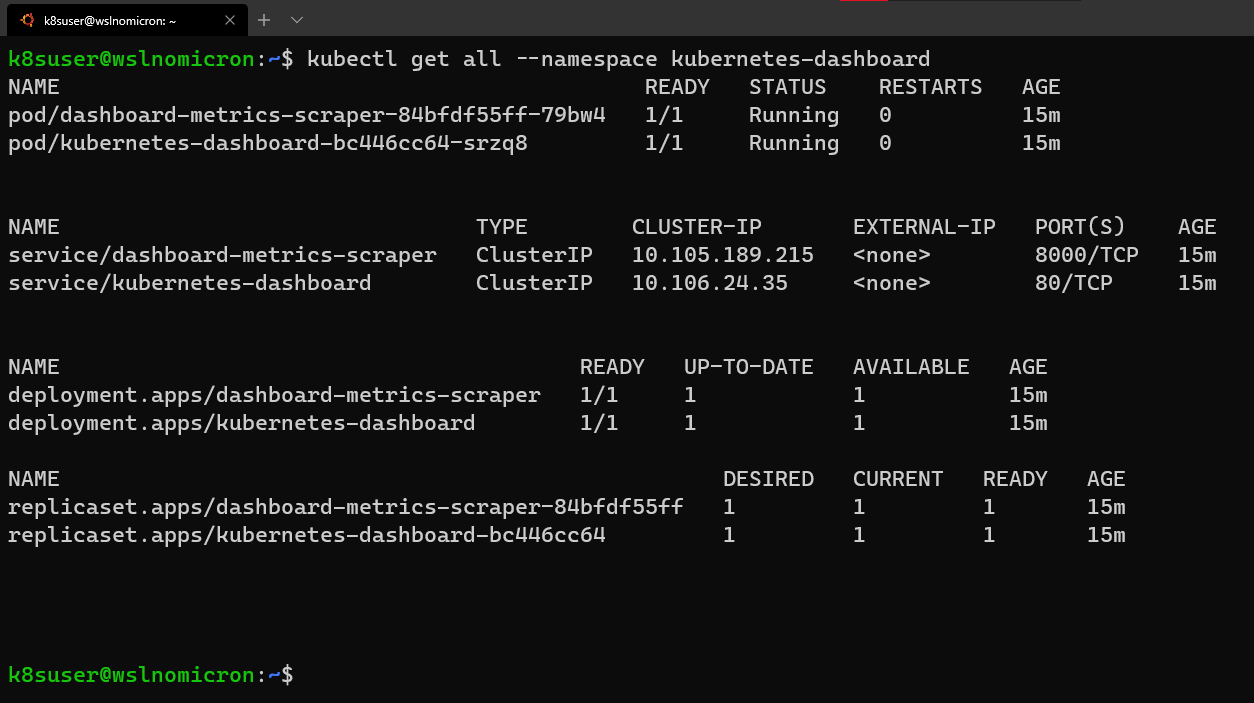
尽管如此,如果我们查看命名空间kubernetes-dashboard,我们仍将看到在创建的服务:
# Get all the services from the dashboard namespace
kubectl get all --namespace kubernetes-dashboard
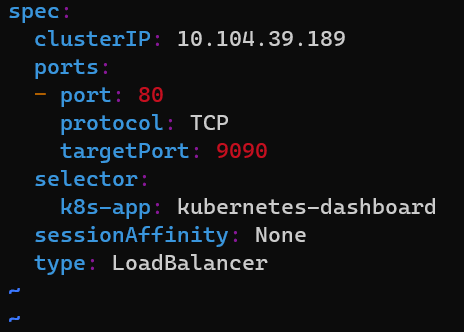
编辑服务,并将其类型更改为LoadBalancer:
# Edit the Dashoard service
kubectl edit service/kubernetes-dashboard --namespace kubernetes-dashboard
# Go to the very end and remove the last 2 lines
status:
  loadBalancer: {}
# Change the type from ClusterIO to LoadBalancer
  type: LoadBalancer
# Save the file
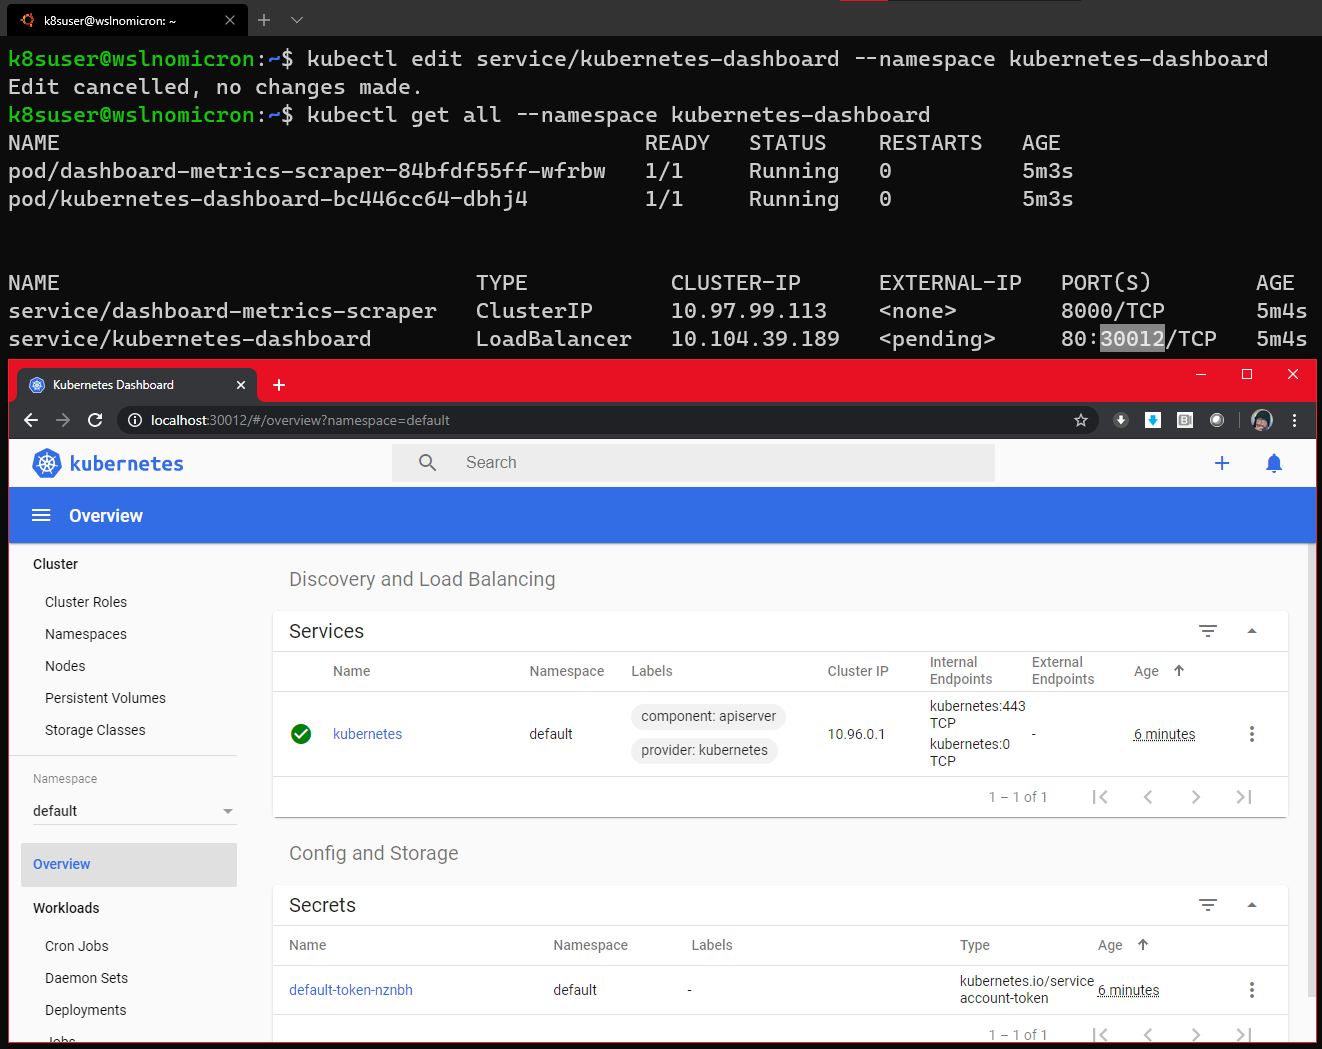
再次检查Dashboard服务,让我们通过LoadBalancer访问Dashboard:
# Get all the services from the dashboard namespace
kubectl get all --namespace kubernetes-dashboard
# Access the Dashboard from a browser on Windows side with the URL: localhost:<port exposed>
总结
| 标准 | Kind | Minikube |
|---|---|---|
| 在WSL2上安装 | 很容易 | 有点复杂 |
| 多节点集群 | 支持 | 不支持 |
| 插件 | 手动安装 | 支持 |
| 持久化 | 支持(但没有针对WSL2设计) | 支持 |
| 替代方案 | K3d | Microk8s |
译文链接: https://kubernetes.io/blog/2020/05/21/wsl-docker-kubernetes-on-the-windows-desktop/

登录后评论
立即登录 注册