
程序猿能量站:每篇一个小技巧,带你玩转IT新时代!
本篇小编不仅手把手教你以最精简的方式创建并运行容器,且将结合源码带你深入探究整个容器技术的核心部分——容器是如何创建并启动。可谓干货满满~
根据官方定义:runC是一个根据OCI(Open Container Initiative)标准创建并运行容器的CLI tool。
Docker就是基于runC创建的,简单地说,runC是Docker中最核心的部分,容器的创建,运行,销毁等等操作最终都将通过调用runC完成。
下面我们将演示如何使用runC以最精简的方式创建并运行一个容器。
下载并编译runC
# create a 'github.com/opencontainers' in your GOPATH/srccd github.com/opencontainers
git clone https://github.com/opencontainers/runc
cd runc
make
sudo make install
创建容器的根文件系统
# create the top most bundle directorymkdir /mycontainer
cd /mycontainer
# create the rootfs directory
mkdir rootfs
# export busybox via Docker into the rootfs directory
docker export $(docker create busybox) | tar -C rootfs -xvf -
利用runC的spec命令创建默认的配置文件config.json,其中包含了创建一个容器所需的所有配置信息
runc spec利用runC运行busybox容器
# run as rootcd /mycontainer
runc run mycontainerid
/ # ls
bin dev etc home proc root sys tmp usr var
可以看到,容器成功运行,此时我们打开另一个终端观察容器的运行状态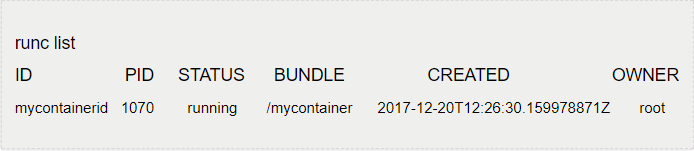 事实上,runc run是一个复合命令,它包含了容器的创建runc create、启动runc start以及在退出之后对容器进行的销毁runc delete,从演示的角度看它是最为直观的。但是如果想要深入理解runC内部的实现机制,将容器的创建,启动,销毁三个步骤分开,显然会让整个过程的分析更为简单和易于接受。
下面我们来结合源码,对整个容器技术最为核心的部分进行探究—— 容器是如何创建并启动的。
首先,我们来对runC的整体代码结构做一个宏观的把控:
[root@VM_68_206_centos runc]# tree -L 1 -F --dirsfirst.
|-- contrib/
|-- libcontainer/|-- man/
|-- script/
|-- tests/
|-- vendor/
|-- checkpoint.go
|-- CONTRIBUTING.md
|-- create.go
|-- delete.go
|-- Dockerfile
|-- events.go
|-- exec.go
|-- init.go
|-- start.go
|-- run.go
......
可以看到在runC的顶层目录中,有着一系列形如create.go, start.go,run.go…的go文件,它们和runC的子命令,例如runc create…,runc start…,runc run是一致的。 另外,在顶层目录中还有一个名为libcontainer的子目录。对于Docker项目的发展历史有所了解的同学应该都知道,libcontainer曾经是Docker中最为核心的包,容器的创建、删除等一系列工作,最终都是交由它来完成的。
这样一来,runC的代码结构就非常清晰了。我们知道,runC是符合OCI标准的容器运行时。不难猜出,它本质上是对libcontainer的一层薄薄的封装。它会先读取符合OCI标准的容器配置,再将其转换成与libcontainer兼容的格式,最后将转换后的配置交由libcontainer来完成具体的工作。
// runc/create.go ...
spec, err := setupSpec(context)
...
status, err := startContainer(context, spec, CT_ACT_CREATE, nil)
...
create.go的工作主要分为两部分:
1. 将容器配置从config.json文件加载到内存中,保存在一个类型为*specs.Spec (Spec即为OCI标准的容器配置在内存中的表现形式)的结构体中
2. 调用startContainer()完成容器的创建工作,值得注意的是runc run , runc create以及runc restore最终都将调用该函数,只是第三个参数不同而已,对于runc create,该参数为CT_ACT_CREATE,表示首次创建容器。接下来程序的执行路径将因该参数的不同而有所不同。
// runc/utils_linux.gofunc startContainer(context *cli.Context, spec *specs.Spec, action CtAct, criuOpts *libcontainer.CriuOpts) (int, error) {
// 从参数中获取容器的id
id := context.Args().First()
if id == "" {
return -1, errEmptyID
}
....
// 创建符合libcontainer格式的container数据结构
container, err := createContainer(context, id, spec)
if err != nil {
return -1, err
}
....
// 创建runner对象
r := &runner{
enableSubreaper: !context.Bool("no-subreaper"),
shouldDestroy: true,
container: container,
listenFDs: listenFDs,
notifySocket: notifySocket,
consoleSocket: context.String("console-socket"),
detach: context.Bool("detach"),
pidFile: context.String("pid-file"),
preserveFDs: context.Int("preserve-fds"),
action: action,
criuOpts: criuOpts,
}
return r.run(spec.Process)
}
startContainer的工作由如下三部分组成:
1. 从参数中获取容器的id,例如对于命令runc create abc,则获取的id即为abc
2. 调用createContainer,根据spec中Container相关的内容,调用libcontainer创建容器对象,且容器的状态设置为Stopped。此时的容器仅仅只是一个内存中的数据结构,并没有与之对应的进程
3. 创建runner对象并调用相应的run方法,该对象会将spec中的Process转换成libcontainer兼容的模式,并对容器的IO进行配置
// runc/utils_linux.gofunc (r *runner) run(config *specs.Process) (int, error) {
...
// 将spec的Process转换为libcontainer要求的Process配置格式
process, err := newProcess(*config)
if err != nil {
r.destroy()
return -1, err
}
...
tty, err := setupIO(process, rootuid, rootgid, config.Terminal, detach, r.consoleSocket)
...
switch r.action {
// 根据action,创建,恢复或者运行容器
case CT_ACT_CREATE:
err = r.container.Start(process)
case CT_ACT_RESTORE:
err = r.container.Restore(process, r.criuOpts)
case CT_ACT_RUN:
err = r.container.Run(process)
default:
panic("Unknown action")
}
run方法的工作同样由三部分组成:
1. 将OCI标准的进程配置specs.Process转换为符合libcontainer格式的进程配置libcontainer.Process
2. 调用setupIO对进程的IO进行配置,因为IO涉及的内容较为复杂,会在另外的文章中详细叙述
3. 根据startContainer配置参数的不同,调用不同的方法,分别进行容器的创建,运行或者恢复,本文我们只讨论CT_ACT_CREATE这种情况
到此为止,我们已经将OCI格式的配置,不管是Container还是Process都转换成了libcontainer要求的格式。接着我们将深入libcontainer,真正完成容器实例的创建工作。
// runc/libcontainer/container_linux.gofunc (c *linuxContainer) Start(process *Process) error {
...
status, err := c.currentStatus()
...
if status == Stopped {
// 如果容器的状态为Stopped,则先创建管道exec.fifo
if err := c.createExecFifo(); err != nil {
return err
}
}
if err := c.start(process, status == Stopped); err != nil {
if status == Stopped {
// 如果从Stopped状态启动失败,则删除管道exec.fifo
c.deleteExecFifo()
}
return err
}
return nil
}
Start方法仅仅只是对start的一个封装并且会在容器状态为Stopped时(即新建容器时),创建一个路径为/run/runc/$ID/exec.fifo的管道文件,它的作用我们会在后文中详细描述。
值得注意的是start方法的第二个参数对容器的状态进行了判断。事实上,命令runc create和runc exec的代码的执行路径是类似的,它俩共享了大部分的代码。因此,这里我们需要对容器的状态进行判断,如果容器的状态为Stopped说明接下来应当进行容器的创建,否则应当在已有容器中exec一个新进程。
// runc/libcontainer/container_linux.gofunc (c *linuxContainer) start(process *Process, isInit bool) error {
...
parent, err := c.newParentProcess(process, isInit)
...
if err := parent.start(); err != nil {
...
}
...
if isInit {
// 设置容器的状态为created
c.state = &createdState{
c: c,
}
...
if c.config.Hooks != nil {
// 返回bundle以及用户定义的annotations
bundle, annotations := utils.Annotations(c.config.Labels)
s := configs.HookState{
Version: c.config.Version,
ID: c.id,
Pid: parent.pid(),
Bundle: bundle,
Annotations: annotations,
}
for i, hook := range c.config.Hooks.Poststart {
// 容器启动完成之后,运行PostStart hook
if err := hook.Run(s); err != nil {
...
}
}
}
} else {
// 如果容器不是第一次启动,标记的状态为running
c.state = &runningState{
c: c,
}
}
return nil
}
start方法的工作也可以分为如下三部分:
1. 调用newParentProcess创建parentProcess对象
2. 调用parentProcess的start方法,它真正完成容器进程的创建以及初始化工作
3. 如果isInit参数为true,则说明执行的命令为runc create,更新容器状态为Created,并且如果定义了hooks(回调函数),则还需要执行PostStart类型的hook函数。否则,如果执行的命令为runc exec,则更新容器状态为Running
// runc/libcontainer/container_linux.gofunc (c *linuxContainer) newParentProcess(p *Process, doInit bool) (parentProcess, error) {
parentPipe, childPipe, err := utils.NewSockPair("init")
...
// 创建子进程的运行模板
cmd, err := c.commandTemplate(p, childPipe)
...
if !doInit {
// 如果为exec命令,则调用c.newSetnsProcess
return c.newSetnsProcess(p, cmd, parentPipe, childPipe)
}
...
if err := c.includeExecFifo(cmd); err != nil {
...
}
return c.newInitProcess(p, cmd, parentPipe, childPipe)
}
newParentProcess首先创建了一个名为init的管道,它一方面会在创建容器时给容器的初始化进程传输容器的配置信息,另一方面它也会用于runC和容器进程之间的同步。
之后,它会调用commandTemplate创建容器初始化进程的运行模板,如下所示:
// runc/libcontainer/container_linux.gofunc (c *linuxContainer) commandTemplate(p *Process, childPipe *os.File) (*exec.Cmd, error) {
cmd := exec.Command(c.initPath, c.initArgs[1:]...)
cmd.Args[0] = c.initArgs[0]
cmd.Stdin = p.Stdin
cmd.Stdout = p.Stdout
cmd.Stderr = p.Stderr
cmd.Dir = c.config.Rootfs
...
// 让子进程获取init pipe的信息
cmd.Env = append(cmd.Env,
fmt.Sprintf("_LIBCONTAINER_INITPIPE=%d", stdioFdCount+len(cmd.ExtraFiles)-1),
)
...
return cmd, nil
}
从上面的代码中我们可以看出,环境变量也是runC进程和容器初始化进程之间进行交互的一种重要方式。上文中init管道的信息就是通过环境变量的方式从runC传递给容器初始化进程的。
到这里,我们脑海中可能会浮现出另一个问题:c.initPath应该就是容器初始化进程的二进制文件的路径,那么它是一个独立于runC的二进制文件么?它又是放在哪的呢?事实上,c.initPath在上文初始化Container对象时会被初始化为/proc/self/exe,而c.initArgs被设置为init ,因此我们创建子进程的过程其实相当于执行了runc init这条命令。
如果执行的命令为runc create,还需要将前文提到的exec.fifo这个管道同样以环境变量的形式传递到容器初始化进程中。最后,调用newInitProcess将所有配置都填充至结构体initProcess中。
// runc/libcontainer/process_linux.gofunc (p *initProcess) start() error {
...
// 启动子进程
err := p.cmd.Start()
...
// 将bootstrapData的数据写入pipe
if _, err := io.Copy(p.parentPipe, p.bootstrapData); err != nil {
return newSystemErrorWithCause(err, "copying bootstrap data to pipe")
}
...
ierr := parseSync(p.parentPipe, func(sync *syncT) error {
switch sync.Type {
case procReady:
...
// call prestart hooks
// 调用prestart hooks
if !p.config.Config.Namespaces.Contains(configs.NEWNS) {
...
if p.config.Config.Hooks != nil {
...
for i, hook := range p.config.Config.Hooks.Prestart {
if err := hook.Run(s); err != nil {
return newSystemErrorWithCausef(err, "running prestart hook %d", i)
}
}
}
}
// Sync with child.
if err := writeSync(p.parentPipe, procRun); err != nil {
return newSystemErrorWithCause(err, "writing syncT 'run'")
}
...
case procHooks:
// Setup cgroup before prestart hook, so that the prestart hook could apply cgroup permissions.
// 首先设置cgroup
if err := p.manager.Set(p.config.Config); err != nil {
return newSystemErrorWithCause(err, "setting cgroup config for procHooks process")
}
...
if p.config.Config.Hooks != nil {
...
// 执行hooks
for i, hook := range p.config.Config.Hooks.Prestart {
if err := hook.Run(s); err != nil {
return newSystemErrorWithCausef(err, "running prestart hook %d", i)
}
}
}
// Sync with child.
if err := writeSync(p.parentPipe, procResume); err != nil {
return newSystemErrorWithCause(err, "writing syncT 'resume'")
}
...
}
...
})
...
// 关闭init pipe
if err := unix.Shutdown(int(p.parentPipe.Fd()), unix.SHUT_WR); err != nil {
return newSystemErrorWithCause(err, "shutting down init pipe")
}
...
}
initProcess结构的start方法真正完成了容器进程的创建,并通过init管道协助其完成初始化工作。该方法首先调用p.cmd.Start()创建一个独立的进程,执行命令runc init。接着通过init管道将容器配置p.bootstrapData写入管道中。然后再调用parseSync()函数,通过init管道与容器初始化进程进行同步,待其初始化完成之后,执行PreStart Hook等一些回调操作。最后,关闭init管道,容器创建完成。
runC端在创建容器时所做的工作我们已经基本了解了,下面我们来看看runc init,也就是容器初始化进程具体完成了哪些工作。
// runc/libcontainer/factory_linux.gofunc (l *LinuxFactory) StartInitialization() (err error) {
var (
pipefd, fifofd int
consoleSocket *os.File
envInitPipe = os.Getenv("_LIBCONTAINER_INITPIPE")
envFifoFd = os.Getenv("_LIBCONTAINER_FIFOFD")
envConsole = os.Getenv("_LIBCONTAINER_CONSOLE")
)
// Get the INITPIPE.
pipefd, err = strconv.Atoi(envInitPipe)
if err != nil {
return fmt.Errorf("unable to convert _LIBCONTAINER_INITPIPE=%s to int: %s", envInitPipe, err)
}
var (
pipe = os.NewFile(uintptr(pipefd), "pipe")
// 判断是`runc create`还是`runc exec`
it = initType(os.Getenv("_LIBCONTAINER_INITTYPE"))
)
defer pipe.Close()
// Only init processes have FIFOFD.
// 只有init进程有FIFOFD
fifofd = -1
if it == initStandard {
if fifofd, err = strconv.Atoi(envFifoFd); err != nil {
return fmt.Errorf("unable to convert _LIBCONTAINER_FIFOFD=%s to int: %s", envFifoFd, err)
}
}
...
i, err := newContainerInit(it, pipe, consoleSocket, fifofd)
if err != nil {
return err
}
// If Init succeeds, syscall.Exec will not return, hence none of the defers will be called.
return i.Init()
}
作为容器的初始化进程,必须先通过init管道获取配置才能进行下一步的工作。显然,我们首先要做的就是从环境变量中获取与runC进程进行交互的管道的信息,包括init管道。对于runc create还有管道exec.fifo,即上方代码中的fifofd。紧接着,调用函数newContainerInit,创建用于初始化的接口对象initer,该函数的代码如下:
// runc/libcontainer/init_linux.gofunc newContainerInit(t initType, pipe *os.File, consoleSocket *os.File, fifoFd int) (initer, error) {
var config *initConfig
// 从管道中读取config
if err := json.NewDecoder(pipe).Decode(&config); err != nil {
return nil, err
}
...
switch t {
case initSetns:
return &linuxSetnsInit{
pipe: pipe,
consoleSocket: consoleSocket,
config: config,
}, nil
case initStandard:
return &linuxStandardInit{
pipe: pipe,
consoleSocket: consoleSocket,
parentPid: unix.Getppid(),
config: config,
fifoFd: fifoFd,
}, nil
}
return nil, fmt.Errorf("unknown init type %q", t)
}
该函数的作用非常明显,从init管道中读取容器配置,解析至initConfig中。对于runc create,创建linuxStandardInit结构,将各种配置信息写入其中。最后,调用该结构的Init方法真正对容器进行初始化。
// runc/libcontainer/standard_init_linux.gofunc (l *linuxStandardInit) Init() error {
...
// 配置network, 配置路由等等
...
// 准备rootfs
if err := prepareRootfs(l.pipe, l.config); err != nil {
return err
}
// 配置console, hostname, apparmor, process label, sysctl等等
...
// 告诉父进程我们已经准备好Exec了
if err := syncParentReady(l.pipe); err != nil {
return err
}
// 配置seccomp
...
// 设置正确的capability,用户以及工作目录
if err := finalizeNamespace(l.config); err != nil {
return err
}
...
// 确定用户指定的容器进程在容器文件系统中的路径
name, err := exec.LookPath(l.config.Args[0])
if err != nil {
return err
}
// 关闭管道,告诉runC进程,我们已经完成了初始化工作
l.pipe.Close()
// 在exec用户进程之前等待exec.fifo管道在另一端被打开
// 我们通过/proc/self/fd/$fd打开它
fd, err := unix.Open(fmt.Sprintf("/proc/self/fd/%d", l.fifoFd), unix.O_WRONLY|unix.O_CLOEXEC, 0)
...
// 向exec.fifo管道写数据,阻塞,直到用户调用`runc start`,读取管道中的数据
if _, err := unix.Write(fd, []byte("0")); err != nil {
return newSystemErrorWithCause(err, "write 0 exec fifo")
}
...
// 调用exec命令,执行用户进程
if err := syscall.Exec(name, l.config.Args[0:], os.Environ()); err != nil {
return newSystemErrorWithCause(err, "exec user process")
}
return nil
}
Init方法真正完成了对容器的初始化工作,它会对容器的网络、路由、hostname等一系列属性进行配置。这些工作一般都是直接通过系统调用设置完成的,因此我们就不再细述了。接下来我们将重点描述容器初始化进程和其父进程,即runC进程的同步过程。
我们知道,每个容器都有自己的根文件系统,到目前为止我们依然还是宿主机文件系统的视角,那么文件系统根目录的切换是在哪里进行的呢?答案是显然的,prepareRootfs。
// runc/libcontainer/rootfs_linux.gofunc prepareRootfs(pipe io.ReadWriter, iConfig *initConfig) (err error) {
...
// 配置mounts, dev
...
// 通知父进程运行pre-start hooks
if err := syncParentHooks(pipe); err != nil {
return err
}
...
if config.NoPivotRoot {
err = msMoveRoot(config.Rootfs)
} else if config.Namespaces.Contains(configs.NEWNS) {
err = pivotRoot(config.Rootfs)
} else {
err = chroot(config.Rootfs)
}
...
return nil
prepareRootfs先对容器的Mounts和Dev等信息进行配置,之后再调用syncParentHooks,通过init管道向runC进程发送procHooks信号。runC进程接收到procHooks信号之后,执行容器的PreStart Hook回调函数,再通过init管道给容器初始化进程发送信号procResume,通知其继续执行。可见容器的PreStart Hook是在根目录尚未切换之前执行完成的。最终,调用chroot函数,切换根目录。至此,容器的文件系统切换完毕。
在文件系统准备完成之后,Init方法还会对Console, hostname等属性进行配置。当一切就绪后,调用syncParentReady通过init管道通知runC进程,获取响应后,关闭init管道,同步结束,准备开始执行用户指定的容器进程。
不过在找到了用户指定的容器程序在容器文件系统的执行路径之后,初始化进程又打开了我们之前多次提到的exec.fifo这个管道,并且往里面写入了一个字节,然后才执行Exec系统调用,切换到用户程序。既然exec.fifo是一个管道,那么我们在这一端写入之后,就必须有消费者在另外一端进行读取,否则写进程就会一直处于阻塞状态。
事实上,此处对exec.fifo管道的写阻塞正是runc create和runc start执行流的分界点。容器的创建工作,在容器初始化进程往exec.fifo管道进行写操作的那一刻,就全部结束了。
相对于容器的创建,容器的启动就非常简单了
// runc/start.go container, err := getContainer(context)
...
status, err := container.Status()
...
switch status {
case libcontainer.Created:
return container.Exec()
case libcontainer.Stopped:
return errors.New("cannot start a container that has stopped")
case libcontainer.Running:
return errors.New("cannot start an already running container")
default:
return fmt.Errorf("cannot start a container in the %s state\n", status)
}
当我们执行runc start命令时,我们首先会获取相应容器的状态。显然,只有状态为Created的容器才是合法的,此时需要调用容器的Exec方法。
func (c *linuxContainer) exec() error { // 获取exec.fifo的路径
path := filepath.Join(c.root, execFifoFilename)
fifoOpen := make(chan struct{})
select {
// 等待fifoOpen发来信号,或者子进程变为僵尸进程
case <-awaitProcessExit(c.initProcess.pid(), fifoOpen):
return errors.New("container process is already dead")
case result := <-awaitFifoOpen(path):
close(fifoOpen)
if result.err != nil {
return result.err
}
f := result.file
defer f.Close()
if err := readFromExecFifo(f); err != nil {
return err
}
return os.Remove(path)
}
}
Exec方法仅仅只是对exec的简单封装。而exec方法的工作很简单,找到exec.fifo管道的路径,打开它,并调用readFromExecFifo从管道中将容器初始化进程从另一端写入的字节读出。一旦管道中的数据被读出,容器内的初始化进程将不再被阻塞,紧接着将完成Exec系统调用,容器初始化进程将被切换为用户指定的程序。到此为止,一个容器才算真正启动成功。
可是这一路分析下来,似乎并没有对容器的namespace进行配置的操作,事实上,子进程runc init的执行流在进入Go语言的运行时之前,会被包/runc/libcontainer/nsenter劫持,先去执行一段C代码。这段C代码同样会从init管道中读取容器的配置,主要是namespace的路径,clone flag等等,并根据这些配置,调用setns系统调用,将容器进程加入到合适的namespace中。之后再进入Go的运行时,完成上文所述的各种初始化操作。
简而言之,runC创建容器的过程如下图所示:
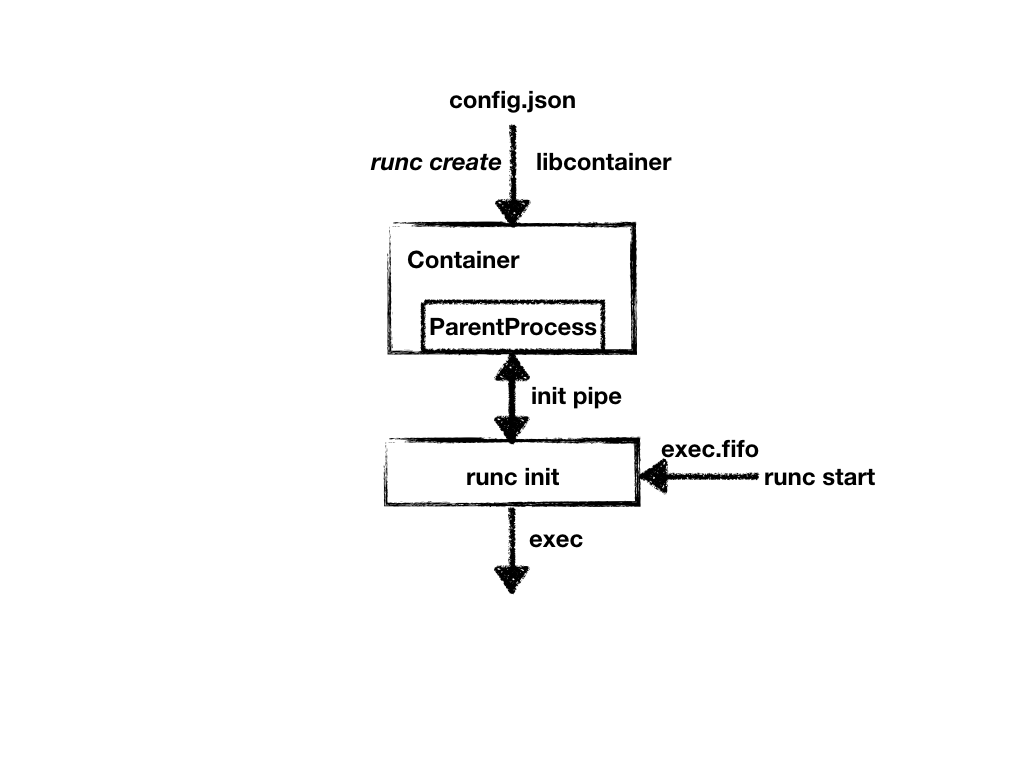
1. runc create命令加载文件config.json中容器的配置并转化为与libcontainer兼容的模式
2. libcontainer根据配置创建Container以及ParentProcess对象
3. Parentproces创建runc init子进程,中间会被/runc/libcontainer/nsenter劫持,使runc init子进程位于容器配置指定的各个namespace内
4. ParentProcess用init管道将容器配置信息传输给runc init进程,runc init再据此进行容器的初始化操作。初始化完成之后,再向另一个管道exec.fifo进行写操作,进入阻塞状态
5. 执行runc start命令,从管道exec.fifo中读取上一个步骤写入的字节。runc init进程不再阻塞,执行Exec系统调用,切换至用户指定的容器进程,容器真正创建并启动完成。
关于Docker容器引擎runC执行框架的介绍到这里就结束啦,大家在实践中如果有什么疑问或者难点都可以给小编留言哦~
– END –
________________________________________________________________________________________________
参考文献:
1. runC源码:https://github.com/opencontainers/runc/tree/v1.0.0-rc5
2. OCI和runc:容器标准化和docker:http://cizixs.com/2017/11/05/oci-and-runc
注:
1. 文中源码对应的runC版本为v1.0.0-rc5,commit:4fc53a81fb7c994640722ac585fa9ca548971871
2. 文中引用的代码因文章效果做了部分删减,详细的源码关注公众号“谐云科技”后台回复“源码”获取
3.原创文章,未经允许,不得转载!

登录后评论
立即登录 注册