
本文通过完整示例,使用Oauth2,Oauth2-Client,Spring Cloud和Netflix组件在微服务分布式系统中实现Oauth2安全性。
目的
软件开发组织常常需要一个解决方案,在其中我们可以轻松利用Oauth2 and Oauth2 Client,以便与所有微服务进行安全通信。这个方案,主要着眼于如何将oauth2的理念融入到微服务架构中,没有令牌,用户就将无法访问API。当用户提供基本和身份验证详细信息可以生成用于访问API的令牌时,该令牌将可用。
所有用户请求都将通过一个API网关,但是服务间可以通信。API网关将使用Zuul Netflix OSS组件进行动态路由。当请求进入服务时,每个请求都将检查授权,并且服务将请求授权服务器验证其是否经过身份验证。
本文目标
- 根据 Spring security, Oauth2, Oauth2 client实现身份验证/授权
- 使用Spring Cloud,Netfllix OSS了解微服务架构
- 基于 Java, Spring and Oauth2的微服务架构演示
什么是微服务?
微服务是一种面向服务的架构模式,其中应用程序构建和分解为各种最小的独立服务单元的集合。它是一种软件工程方法,致力于将应用程序分解为具有接口定义明确和功能清晰的单功能模块。这些模块可由管理服务整个生命周期的小型团队独立部署和操作。
Spring Cloud和微服务
首先,我们不编写微服务。我们编写一个服务,当与其他服务一起部署以形成应用程序时,该服务最终将称为微服务。
Spring Cloud为你提供了一些工具(eureka, zuul, feign, ribbon等)的抽象,从而使你可以轻松地与Spring应用程序集成。
你也可以在不使用Spring Cloud的情况下实现微服务架构。你可以利用诸如Kubernetes, docker swarm, haproxy, Kong, nginx等之类的工具来实现相同目的。不使用Spring Cloud的优点有其优点和缺点,反之亦然。
具有授权的高级微服务架构

通过这个架构图,我们可以看到
- 用户使用基本授权和登录凭证登录系统。
- 如果用户基本身份验证和登录凭据匹配,则用户将获得令牌。
- 接下来,用户发送请求以从服务访问数据。API网关接收请求并与授权服务器进行核对。
- 每个请求都会经过API网关
- 安全检查和动态路由到服务
- 每个微服务都有一个数据库来处理数据。
Spring Cloud关键概念和功能
- Spring Cloud适用于管理微服务的配置信息
- 智能路由和服务发现
- 服务间的调用
- 负载均衡(到后端服务器合适的网络流量路由)
- 领导选举(该应用程序与作为第三方系统的另一个应用程序一起使用)
- 全局锁(不能同时访问同一资源的两个线程)
- 分布式配置和消息传递
如果你想在一个应用程序中使用许多服务,那么基于云的应用程序是一种简便的方法。Spring Cloud的工作方式与此相同。
Spring Boot关键概念和功能
- Spring Boot可以创建微服务
- Spring Application可以创建独立的Spring应用程序
- 内嵌容器(Tomcat, JTTY or Undertrow),无需部署war文件。
- 外部化配置信息
- 安全性(内置通过所有http端点上的基本身份验证)
- 应用程序事件和监听器
- Spring Boot在基于产品的Web应用程序上工作。它减少了用于单元测试和集成测试时间。
Spring Cloud的优势:
- 提供云服务开发
- 它是基于微服务的架构和配置
- 提供服务间通信
- 它基于Spring Boot模型
Spring Cloud有5个主要注释:
- @EnableConfigServer
使用它作为配置中心
- @EnableEurekaServer
使用它查找服务
- @EnableDiscoveryClient
使用它来发现其他服务。
- @EnableCircuitBreaker
当相关服务失败时,会使用断路器模式继续运行,并防止级联失败。此注释用于Hystrix断路器。
- @HyStrixCommand(fallbackmethod=”MethodName”)
Hystrix是用于分布式系统的延迟和容错库。
Netflix组件概述
Spring Cloud Netflix通过一些简单的注释,你可以快速启用和配置应用程序内部的通用组件。所提供的组件包括Service Discovery (Eureka),Circuit Breaker (Hystrix),Intelligent Routing (Zuul)和Client-Side Load Balancing (Ribbon)。
Eureka(服务注册和发现)
- 微服务在注册中心(Eureka Client)上进行注册
- Web应用程序,可以使用Spring Cloud Netflix Feign Client调用上面的微服务
Ribbon(动态路由和负载均衡器)
- Ribbon主要提供客户端负载均衡算法。
- API具备负载均衡,容错,缓存/批处理的特性
- 可配置的负载均衡规则
Hystrix(断路器)
- Hystrix是容错库。
- 该工具旨在将分布式服务(如微服务)中的远程服务,系统和第三方库的访问点分开。它通过隔离故障服务并防止故障的级联效应来改善整个系统。
Zuul(网关服务器)
- Zuul将充当我们的API网关
- 处理动态路由
- Zuul旨在实现动态路由,监视,弹性和安全性。
什么是Feign Client?
Netflix提供Feign作为基于REST的调用,通过它们微服务可以相互通信。
Feign客户端使用声明性方法来访问API。
要使用它,我们必须在Spring Boot Application上启用@EnableFeignClients注解。
服务器端负载均衡:
在JavaEE体系结构中,我们将war/ear文件部署到多个应用程序服务器中,然后创建一个服务器池,并将在服务器池的前面放置一个load balancer (Netscaler),该池具有一个公共IP。
客户端使用该公用IP发出请求,然后Netscaler决定通过轮询或粘性会话算法在哪个内部应用服务器中转发该请求。我们称其为服务器端负载均衡。
技术栈:
- Java 8+
- Spring Latest
- Spring security
- Oauth2, Oauth2 Client
- Spring Cloud
- Netflix OSS
- PostgreSQL
- IntliJ
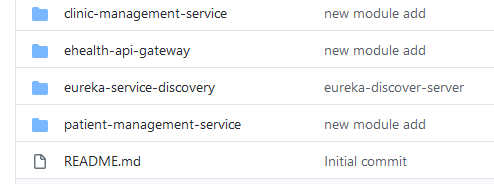
创建项目结构:

步骤1:创建项目”central configuration”
使用微服务,我们创建了一个中央配置服务器,其中微服务的所有可配置参数均由版本控制。
中央配置服务器的好处是,如果我们更改微服务的属性,它可以在不用重新部署启动微服务。
你可以使用以下链接创建项目:https://start.spring.io/。
application.properties 属性文件
spring.application.name=ehealth-central-configuration
server.port=8888
eureka.client.service-url.defaultZone=http://localhost:8761/eureka/
# available profiles of the application
spring.profiles.active=local,development,production
spring.cloud.config.server.git.uri=https://github.com/amran-bd/cloud-config
spring.cloud.config.server.git.clone-on-start=true
spring.cloud.config.server.git.search-paths=patient-management-service,ehealth-api-gateway,eureka-service-discovery,clinic-management-service
management.security.enabled=false
#To remove WAR - Could not locate PropertySource: None of labels [] found
health.config.enabled=false
# To remove I/O Issue Could not locate PropertySource: I/O error on GET request for
spring.cloud.config.enabled=false
如果你愿意,可以使用我的git存储库:https://github.com/amran-bd/cloud-config
EhealthCentralConfigurationApplication.Java 类的例子:
package com.amran.central.config; import org.springframework.boot.SpringApplication; import org.springframework.boot.autoconfigure.SpringBootApplication; import org.springframework.cloud.config.server.EnableConfigServer; @EnableConfigServer //@EnableDiscoveryClient @SpringBootApplication public class EhealthCentralConfigurationApplication { public static void main(String[] args) { SpringApplication.run(EhealthCentralConfigurationApplication.class, args); } }
你必须包含注释 @EnableConfigServer
为服务创建中央配置的示例:
提示:创建文件夹
步骤2:创建Discovery Server项目
bootstrap.properties属性文件
spring.application.name=eureka-service-discovery spring.profiles.active=development # ip and port of the config server spring.cloud.config.uri=http://localhost:8888 # expose actuator endpoints management.endpoints.web.exposure.include=refresh management.security.enabled=false spring.cloud.config.fail-fast=true
我们可以通过属性文件启用和禁用其他actuator端点。 如果要启用所有actuator端点,则添加以下属性。 management.endpoints.web.exposure.include=* 要仅启用特定的actuator端点,请提供端点ID列表。
management.endpoints.web.exposure.include=health,info,
beans,env
在某些情况下,如果服务无法连接到Config Server,则可能需要使服务启动失败。如果要实现客户端优先判断config server获取是否正常,并快速响应失败内容,只需配置参数spring.cloud.config.failFast=true即可。
EurekaServiceDiscoveryApplication.java 类示例:
package com.amran.service.discovery; import org.springframework.boot.SpringApplication; import org.springframework.boot.autoconfigure.SpringBootApplication; import org.springframework.cloud.netflix.eureka.server.EnableEurekaServer; @SpringBootApplication @EnableEurekaServer public class EurekaServiceDiscoveryApplication { public static void main(String[] args) { SpringApplication.run(EurekaServiceDiscoveryApplication.class, args); } }
你必须包含注释 @EnableEurekaServer.
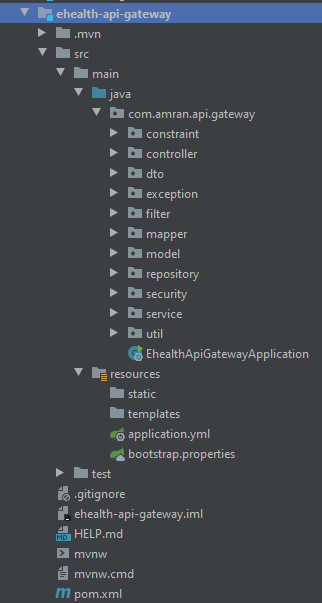
步骤3:创建API Gateway项目。
API网关项目结构
application.yml属性文件
#hystrix:
#  command:
#    default:
#      execution:
#        isolation:
#          thread:
#            timeoutInMilliseconds: 5000
hystrix:
  command:
    clinic-management-service:
      execution:
        isolation:
          thread:
            timeoutInMilliseconds: 5000
    patient-management-service:
      execution:
        isolation:
          thread:
            timeoutInMilliseconds: 5000
在这里,可以为每个单独的服务定义超时,也可以使用默认值。有关更多信息,请访问:https : //www.cars24.com/blog/hystrix-how-to-handle-cascading-failures-in-microservices/
bootstrap.properties属性文件
spring.application.name=ehealth-api-gateway spring.profiles.active=development # ip and port of the config server spring.cloud.config.uri=http://localhost:8888 # expose actuator endpoints management.endpoints.web.exposure.include=refresh management.security.enabled=false spring.cloud.config.fail-fast=true
配置示例:
spring.application.name=ehealth-api-gateway
server.port=8080
eureka.client.service-url.defaultZone=http://localhost:8761/eureka/
## PostgreSQL
spring.datasource.url=jdbc:postgresql://localhost:3307/ehealth-security
spring.datasource.username=postgres
spring.datasource.password=test1373
spring.datasource.type=com.zaxxer.hikari.HikariDataSource
# Hikari will use the above plus the following to setup connection pooling
spring.datasource.hikari.minimumIdle=3
spring.datasource.hikari.maximumPoolSize=500
spring.datasource.hikari.idleTimeout=30000
spring.datasource.hikari.poolName=SpringBootJPAHikariCP
spring.datasource.hikari.maxLifetime=2000000
spring.datasource.hikari.connectionTimeout=30000
spring.datasource.pool-prepared-statements=true
spring.datasource.max-open-prepared-statements=250
spring.jpa.hibernate.connection.provider_class=org.hibernate.hikaricp.internal.HikariCPConnectionProvider
spring.jpa.properties.hibernate.dialect = org.hibernate.dialect.PostgreSQL82Dialect
#Hibernate Configuration
spring.jpa.generate-ddl = true
spring.jpa.hibernate.ddl-auto=update
spring.jpa.show-sql=true
server.error.include-stacktrace=never
#feign.hystrix.enabled=true
#hystrix.shareSecurityContext=true
#All url come with prefix/api will interpret
zuul.prefix=/api
#Dynamic Service Registration in Eureka Server (API Gateway)
zuul.routes.patient-management-service.path=/patient-management-service/**
#zuul.routes.patient-management-service.url=http://localhost:8081
zuul.routes.patient-management-service.sensitive-headers
zuul.routes.patient-management-service.service-id=patient-management-service
zuul.routes.clinic-management-service.path=/clinic-management-service/**
#zuul.routes.patient-management-service.url=http://localhost:8082
zuul.routes.clinic-management-service.sensitive-headers
zuul.routes.clinic-management-service.service-id=clinic-management-service
Zuul在进行动态路由时过滤了4种类型。
Zuul filters将请求和状态信息存储在RequestContext中(并通过RequestContext共享)。你可以使用它来获取HttpServletRequest,然后在请求发送之前记录请求的HTTP方法和URL。
error filter, pre filter, post filter, route filter
package com.amran.api.gateway.filter; import com.netflix.zuul.ZuulFilter; /** * @Author : Amran Hosssain on 6/27/2020 */ public class RouteFilter extends ZuulFilter { @Override public String filterType() { return "route"; } @Override public int filterOrder() { return 1; } @Override public boolean shouldFilter() { return true; } @Override public Object run() { System.out.println("Inside Route Filter"); return null; } }
EhealthApiGatewayApplication.java 类示例:
package com.amran.api.gateway; import com.amran.api.gateway.filter.PostFilter; import com.amran.api.gateway.filter.PreFilter; import com.amran.api.gateway.filter.ErrorFilter; import com.amran.api.gateway.filter.RouteFilter; import org.springframework.boot.SpringApplication; import org.springframework.boot.autoconfigure.SpringBootApplication; import org.springframework.cloud.client.circuitbreaker.EnableCircuitBreaker; import org.springframework.cloud.client.discovery.EnableDiscoveryClient; import org.springframework.cloud.netflix.zuul.EnableZuulProxy; import org.springframework.cloud.openfeign.EnableFeignClients; import org.springframework.context.annotation.Bean; @EnableFeignClients @EnableCircuitBreaker @EnableDiscoveryClient @EnableZuulProxy @SpringBootApplication public class EhealthApiGatewayApplication { public static void main(String[] args) { SpringApplication.run(EhealthApiGatewayApplication.class, args); } @Bean public PreFilter preFilter() { return new PreFilter(); } @Bean public PostFilter postFilter() { return new PostFilter(); } @Bean public ErrorFilter errorFilter() { return new ErrorFilter(); } @Bean public RouteFilter routeFilter() { return new RouteFilter(); } }
微服务架构中的Spring安全性和Oauth2实现:

我已经基于Spring安全性完成了Oauth2实现。具体请访问我的github链接。
步骤4创建项目”patient-management-service”
POM.xml
<?xml version="1.0" encoding="UTF-8"?> <project xmlns="http://maven.apache.org/POM/4.0.0" xmlns:xsi="http://www.w3.org/2001/XMLSchema-instance" xsi:schemaLocation="http://maven.apache.org/POM/4.0.0 https://maven.apache.org/xsd/maven-4.0.0.xsd"> <modelVersion>4.0.0</modelVersion> <parent> <groupId>org.springframework.boot</groupId> <artifactId>spring-boot-starter-parent</artifactId> <version>2.3.1.RELEASE</version> <relativePath/> <!-- lookup parent from repository --> </parent> <groupId>com.amran.patient.management</groupId> <artifactId>patient-management-service</artifactId> <version>0.0.1-SNAPSHOT</version> <name>patient-management-service</name> <description>patient-management-service project for Spring Boot</description> <properties> <java.version>1.8</java.version> <spring-cloud.version>Hoxton.SR5</spring-cloud.version> </properties> <dependencies> <dependency> <groupId>org.springframework.boot</groupId> <artifactId>spring-boot-starter-actuator</artifactId> </dependency> <dependency> <groupId>org.springframework.boot</groupId> <artifactId>spring-boot-starter-data-jpa</artifactId> </dependency> <dependency> <groupId>org.springframework.cloud</groupId> <artifactId>spring-cloud-starter-netflix-eureka-client</artifactId> </dependency> <dependency> <groupId>org.springframework.boot</groupId> <artifactId>spring-boot-starter-web</artifactId> </dependency> <dependency> <groupId>org.springframework.cloud</groupId> <artifactId>spring-cloud-config-client</artifactId> </dependency> <dependency> <groupId>org.springframework.boot</groupId> <artifactId>spring-boot-starter-security</artifactId> </dependency> <dependency> <groupId>org.springframework.security.oauth</groupId> <artifactId>spring-security-oauth2</artifactId> <version>2.5.0.RELEASE</version> <scope>compile</scope> </dependency> <!-- <dependency>--> <!-- <groupId>org.springframework.boot</groupId>--> <!-- <artifactId>spring-boot-devtools</artifactId>--> <!-- <scope>runtime</scope>--> <!-- <optional>true</optional>--> <!-- </dependency>--> <dependency> <groupId>org.postgresql</groupId> <artifactId>postgresql</artifactId> <scope>runtime</scope> </dependency> <dependency> <groupId>org.springframework.boot</groupId> <artifactId>spring-boot-configuration-processor</artifactId> <optional>true</optional> </dependency> <dependency> <groupId>org.projectlombok</groupId> <artifactId>lombok</artifactId> <optional>true</optional> </dependency> <dependency> <groupId>org.springframework.boot</groupId> <artifactId>spring-boot-starter-test</artifactId> <scope>test</scope> <exclusions> <exclusion> <groupId>org.junit.vintage</groupId> <artifactId>junit-vintage-engine</artifactId> </exclusion> </exclusions> </dependency> </dependencies> <dependencyManagement> <dependencies> <dependency> <groupId>org.springframework.cloud</groupId> <artifactId>spring-cloud-dependencies</artifactId> <version>${spring-cloud.version}</version> <type>pom</type> <scope>import</scope> </dependency> </dependencies> </dependencyManagement> <build> <finalName>${project.artifactId}</finalName> <plugins> <plugin> <groupId>org.springframework.boot</groupId> <artifactId>spring-boot-maven-plugin</artifactId> </plugin> </plugins> <resources> <resource> <filtering>true</filtering> <directory>src/main/resources</directory> <includes> <include>*.properties</include> </includes> </resource> </resources> </build> </project>
bootstrap.properties属性文件
server.url = Patient Management Service Working... spring.application.name=patient-management-service spring.profiles.active=development # ip and port of the config server spring.cloud.config.uri=http://localhost:8888 # expose actuator endpoints management.endpoints.web.exposure.include=refresh management.security.enabled=false spring.cloud.config.fail-fast=true ##Security parameter## client_id=kidclient client_credential = kidsecret check_authorization_url = http://localhost:8080/oauth/check_token resources_id = ehealth
PatientManagementServiceApplication.java 类的例子:
package com.amran.patient.management; import org.springframework.boot.SpringApplication; import org.springframework.boot.autoconfigure.SpringBootApplication; import org.springframework.cloud.client.discovery.EnableDiscoveryClient; @EnableDiscoveryClient @SpringBootApplication public class PatientManagementServiceApplication { public static void main(String[] args) { SpringApplication.run(PatientManagementServiceApplication.class, args); } }
安全性的Oauth2-Client:
具体参考下面ResourceServerConfig.java 和 WebSecurityConfig.Java 类的例子:
你需要WebSecurityConfigurerAdapter保护/authorize端点的安全并为用户提供身份验证的方法。
一个Spring Boot应用程序可以为你做到这一点(通过WebSecurityConfigurerAdapter使用HTTP基本身份验证添加自己的应用程序)。默认情况下,它将创建一个order = 0的过滤器链,并保护所有资源。
@EnableResourceServer功能和上面类似,但默认情况下添加的过滤器链为order = 3。WebSecurityConfigurerAdapter具有@Order(100)注解。因此,首先将对ResourceServer进行检查(身份验证),然后使用WebSecurityConfigureAdapter扩展进行检查。
ResourceServerConfig.java
package com.amran.patient.management.security; import org.springframework.beans.factory.annotation.Value; import org.springframework.context.annotation.Configuration; import org.springframework.http.HttpMethod; import org.springframework.security.config.annotation.web.builders.HttpSecurity; import org.springframework.security.oauth2.config.annotation.web.configuration.EnableResourceServer; import org.springframework.security.oauth2.config.annotation.web.configuration.ResourceServerConfigurerAdapter; import org.springframework.security.oauth2.config.annotation.web.configurers.ResourceServerSecurityConfigurer; /** * @Author : Amran Hosssain on 6/27/2020 */ @Configuration @EnableResourceServer public class ResourceServerConfig extends ResourceServerConfigurerAdapter { @Value("${resources_id}") private String resourceId; @Override public void configure(HttpSecurity http) throws Exception { http .headers().frameOptions().disable() .and() .csrf().disable() .authorizeRequests() .antMatchers("/eureka/**").permitAll() .anyRequest() .authenticated(); } @Override public void configure(ResourceServerSecurityConfigurer resources) throws Exception { resources.resourceId(resourceId); } }
WebSecurityConfig.Java
package com.amran.patient.management.security; import org.springframework.beans.factory.annotation.Value; import org.springframework.context.annotation.Bean; import org.springframework.context.annotation.Configuration; import org.springframework.security.authentication.AuthenticationManager; import org.springframework.security.config.annotation.web.configuration.EnableWebSecurity; import org.springframework.security.config.annotation.web.configuration.WebSecurityConfigurerAdapter; import org.springframework.security.oauth2.provider.authentication.OAuth2AuthenticationManager; import org.springframework.security.oauth2.provider.token.RemoteTokenServices; import org.springframework.security.oauth2.provider.token.ResourceServerTokenServices; /** * @Author : Amran Hosssain on 6/27/2020 */ @Configuration @EnableWebSecurity public class WebSecurityConfig extends WebSecurityConfigurerAdapter { @Value("${client_id}") private String clientId; @Value("${client_credential}") private String clientSecret; @Value("${check_authorization_url}") private String checkAuthUrl; @Bean public ResourceServerTokenServices tokenServices() { RemoteTokenServices tokenServices = new RemoteTokenServices(); tokenServices.setClientId(clientId); tokenServices.setClientSecret(clientSecret); tokenServices.setCheckTokenEndpointUrl(checkAuthUrl); return tokenServices; } @Override public AuthenticationManager authenticationManagerBean() throws Exception { OAuth2AuthenticationManager authenticationManager = new OAuth2AuthenticationManager(); authenticationManager.setTokenServices(tokenServices()); return authenticationManager; } }
让我们开始演示:
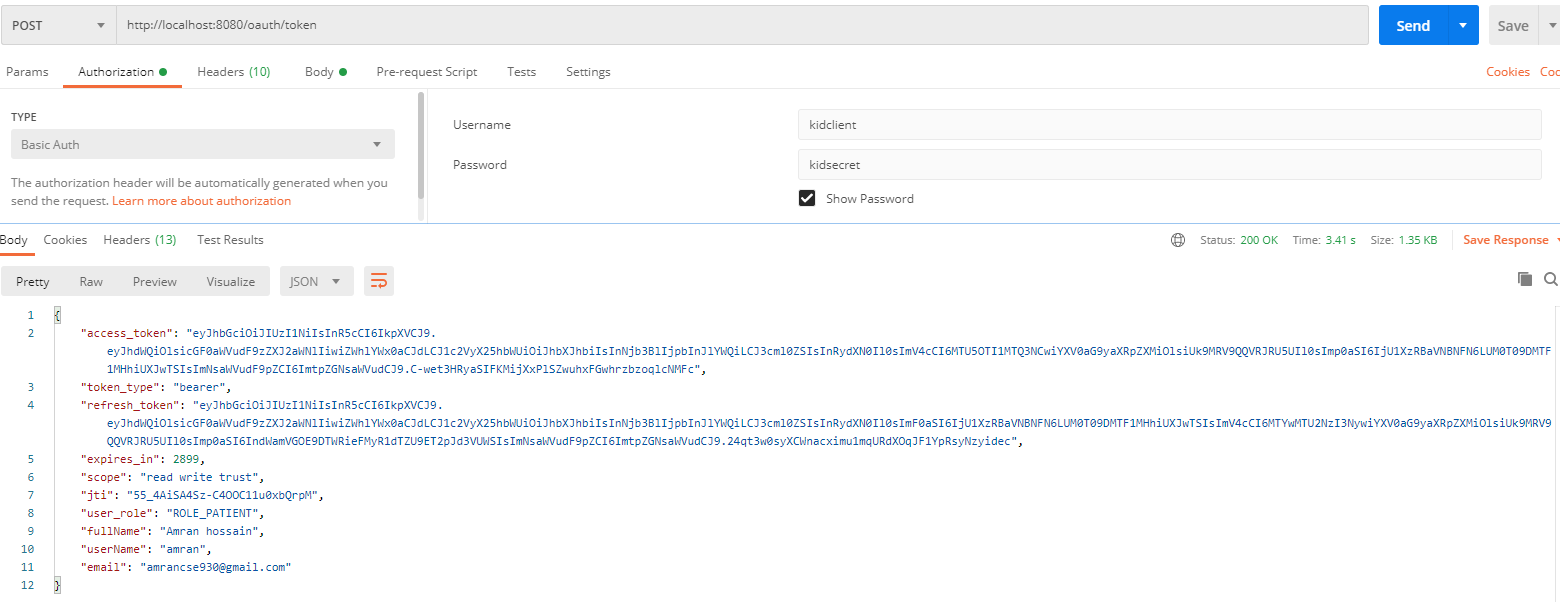
第1步-生成令牌:
项目运行顺序:中央配置服务器-> 服务注册和发现中心-> API网关服务器-> 其他服务。

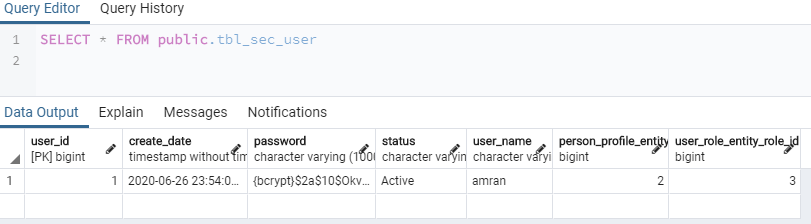
数据库中的客户端详细信息:

用户记录:
生成令牌:
调用 Patient Management服务(Zuul动态路由):
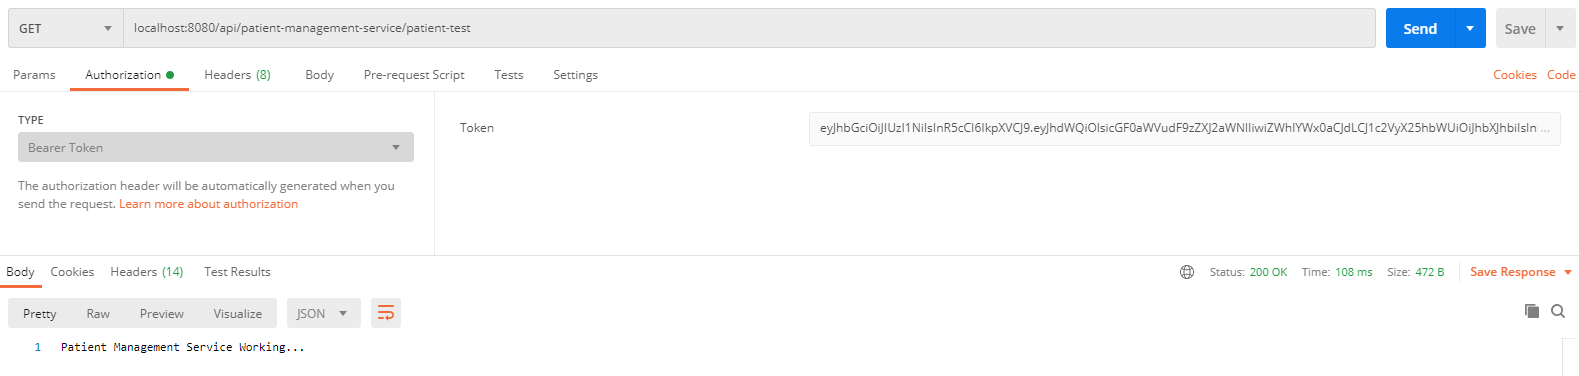
直接调用 Patient Management服务

调用 Clinic Management 服务(Zuul动态路由):

结论
本文通过安全通信,网关,动态路由,故障恢复解决方案,中央配置中心和服务中的Oauth2-client来展示微服务体系结构中的Oauth2实现,以确保每个API请求得到授权。
译文链接:https://dzone.com/articles/how-to-achieve-oauth2-security-in-microservices-di

登录后评论
立即登录 注册